Thursday

Huge Events*.log files in $APPLCSF/$APPLLOG?

For the past 5 years i’ve supported the same Oracle Applications environment but recently, because of changes at my company, I have started to support new environments. Its interesting to see the subtle differences in configuration and to determine why it was setup that way.

The other day I received an automated email alert that a partition was running low on available space. Its the partition which contains $APPLCSF/$APPLLOG (ie. $COMMON_TOP/admin/log/<Context Name>). This directory stores concurrent manager logs, concurrent request logs, etc.

I noticed one file, Events01.log was 7GB in size. I should add that this environment is pretty static, so there aren’t log of changes and it doesn’t get restarted often.

The issue is described in Note:601375.1, which says the culprit is the Fulfillment Server having a high level of debugging enabled. The fix is to change the parameter s_jto_debug_string = OFF in your context file. (Don’t edit this manually, use OAM.) However, to enable this change you’ll need to execute autoconfig.

If your not able to run autoconfig at this time (I prefer to bundle these types of changes with patches so that users will do a quick sanity check of the environment), you can manually edit the file $COMMON_TOP/admin/scripts/<Context Name>/jtffmctl.sh and remove the references to:

-Dengine.LogLevel=9

-Ddebug=full

Once that change is made you need to stop apache (adapcctl.sh), the fulfillment server (jtffmctl.sh) and restart them. You can now remove that huge Events log file.

Note: If you remove an active file while a process is still pointing to it, the space will not be released. I’ve been asked by people many times why they removed a file but did not see the available space increase.

Friday

1 down, 1 to go....

Today I wrote the OCA exam 1Z0-042 and the good news is I passed. I wasn't able to prepare as much as I would have preferred because they are changing the OCA track as of Monday, Dec. 1st. That meant I only had a few weeks to study and given work, home and extra-circular activities (mine and my kids) thats not alot of time.

To study I used the Oracle Press 10g Exam Prep book, Selftest Software and of course 10g installed in a vmware environment. I don't think I would have done as well if it wasn't for the Selftest software, especially since its pretty similar to the exams.

I did have a few issues with the software tho and what I believe were incorrect answers. In one case I tested the solution in my vmware environment and offered to send them the log.. They haven't responded yet. To be just, I believe I found a couple of incorrect answers in the Oracle Press book as well. I contacted the publisher tho and they don't maintain a list of corrections.

I'm glad its over... Now I have to start studying for the next exam but tonight i'm finishing Gears of War 2!!

Monday

Busy Studying . . . but why..?

After studying for the OCA exam for the past few weeks I am now going through demo exams. I have to say, if these are the types of questions I will see on the exam I don't know if I will take the second one.

Alot of the questions are very subjective and you are not provided with enough information to choose the 'best' answer. For example, one question is that a database is having IO issues and is suffering from degraded performance. The available answers are:

1. standby database
2. SQL Tuning/Access Advisors
3. file system without RAID
4. ASM

Depending on the circumstances 1, 2 or 4 may be the answer.

1. I have implemented a few standby databases which are opened in read only mode so that reports could be executed against them. This helped reduce the load on production because they are IO intensive and long running. All of our production environments are on a SAN so there isn't much more tuning we can do there.

2. I've seen databases accessed by poorly written SQL. Look at my post A New Record! So this could be the best answer if this was the database in question.

4. Sure ASM can help but we will be making assumptions about their IO subsystem. For all we know they may only have 1 disk on the server.

BTW> The correct answer was 4.

So for questions like this, I find myself trying to determine the best answer that Oracle may choose, not what may be best given my years of real life experience. Maybe its easier for someone that hasn't worked in the real world to perform well on this exam? That would explain pretty much every OCP we have hired in the past hasn't performed well......

Wednesday

Going to bite the bullet....

and get certified. I've been hauling an Oracle cert book around since version 7 but haven't bothered writing the exams. There are a few reasons why I haven't, one of which probably wouldn't be a good idea to talk about on a public blog. Another is i've worked with quite a few DBA's over my career... The vast majority of OCP's that I have worked with had below average technical skills. The vast majority of great DBA's that I have worked with have not been certified. (Of course there are exceptions to both statements.)

So why am I doing it now? Work is pretty slow at the moment and will be for the foreseeable future... So instead of going stir crazy in my cubicle its something to keep me busy. Its a good way to review all the features of Oracle and this is where I see the real value of an OCP.

Tuesday

Walk through – Installing R12

The following article describes at a medium-high level how to install an R12 Vision Demo environment. Each OS has different pre and post requirements so be sure to read the metalink notes specific for your environment.

The article has two sections, the first lists relevant documentation and Metalink notes. The second section provides installation steps with screenshots of each screen that you will see during the installation process. However, I didn’t detail every pre or post requirement performed because there are differences for various OSes and it could get confusing. I’ll mention the following a few times throughout this article: Make sure you follow the Metalink note for your OS.

Documentation Notes and Links:

Rapid Install Guide


Metalink Notes:

Linux x86 402310.1

Linux x86-64 (64-bit) 416305.1

HP-UX Itanium 402307.1

HP-UX PA-RISC 402308.1

IBM AIX 402306.1

Microsoft Windows 402311.1

Sun Solaris SPARC 402312.1

405565.1 – R12 Installation Guidelines. Contains upto date information which may not be included in the Rapid Install Guide.


549389.1 - Oracle Applications Release Notes, Release 12.0.4 – Contains information on latest Rapid Install patch.

Installation Steps:

  1. Create a user account. I will be using the account oravis which will be a member of the dba group. Some installations use two accounts, applmgr or appl<sid> for the E-Business Suite files and ora<sid> for the database account.

  2. Review your operating system specific metalink note and verify all OS requirements are met. This document can seem overwhelming if you are new to Oracle/E-Business Suite so take your time and read through it. In most cases, you’ll just need to summarize this note for your system administrator. Some of the key areas are:
    1. Confirm your operation system is supported.
    2. Confirm required patches/packages are applied.
    3. Confirm kernel settings.
    4. Modifying various configuration files depending on platform. (/etc/hosts, limits.conf, etc..)

      Each type of OS has different requirements, so make sure you review the appropriate metalink note (above) If you don’t have a system administrator, feel free to ask me questions. I’ll gladly help as best I can.

  3. Download R12 from Oracles eDelivery site, http://edelivery.oracle.com. Unzip the files to create your stage directory. You will need about 75GB of space.
    Note: You don’t have to download every archive listed. You only need to download upto the documentation files, which for version 12.0.4 is around 26 archives (Solaris version).

  4. Download the latest Rapid Install patch as described in Note 549389.1. At the time this article was written the latest patch is 6919017. Uncompress this file within your stage directory. Ie.
    1. $ cd Stage
      $ unzip –o p6919017_R12_GENERIC.zip

  5. Welcome Screen

    cd <Stage DIR>/startCD/Disk1/rapidwiz and launch the program rapidwiz:

    clip_image002
    Click on Next.

    NOTE: The Rapid Install Wizard for the unix or linux platform needs access to an X server. If your not executing rapidwiz from a local xterm on the server then you must export your display to a server in which you have X access. I use Hummingbird Exceed so I can view the GUI on my laptop but there are many other options available.

    For Exceed there are two ways to do this. The easiest way would be to use Exceeds Client Wizard to create a connection. This will automatically set your DISPLAY properties.
    The other option would be to launch Exceed manually, login to your server and set the DISPLAY variable to that of your PC’s IP address.

  6. Wizard Operation Screen

    clip_image004

    Select “Use Express Install” and click on Next. When Express Install is selected you will not be prompted for additional information which will allow you to customize the installation. Since this will be used for self training, it’s a perfect start.

  7. Oracle Configuration Manager

    clip_image006

    Select Decline followed by the Next button.

  8. Express Configuration Information

    Some of the fields below will be pre-populated. For those that aren’t fill them in.

    image

    Once you click on Next , Rapid Install Wizard will perform a system check.

  9. System Check Status

    clip_image010

  10. Pre-Install Checks

    Once the system check is complete you will be presented with a summary window. If any of the checks failed you can click on the red X and it will show you why. If all the checks are successful you will see the following screen:

    clip_image012

    When you click on Next the application will begin to install:

    clip_image014

  11. Post-Install Checks

    Once the install is complete the following window will appear. If you see any red X’s, click on them to get more information on the error. If everything was successful you will see the following window:

    clip_image016

    If everything was successful click Next

  12. Finish

    clip_image018

    The install is complete. Click on the Finish button to exit the Rapid Install Wizard.

  13. Verify

    You can either click on “Connect to Oracle Applications Release 12” button in step 12 or launch a web browser manually. For the URL enter:
    http://<servername>.<domain_name>:<Port number>/OA_HTML/AppsLogin
    <Port Number> is derived from the Port Pool we choose in Step 8 prefixed by the value 80. Since we choose 50 for the port pool, the port number above would be 8050. The following screenshot is of the login page:

    clip_image020

  14. Post-Install Tasks

    Each OS may have different post-installation tasks. For instance, if you installed the Vision Demo environment such as we have above, then you need to submit a concurrent request to build DQM indexes. In the case of Linux (OEL5 REL5), you will have to upgrade the 10.1.3 application server to 10.1.3.3

If you have gotten this far, then you have successfully installed an R12 Vision demo environment. If you have any questions, feel free to ask.

VMware/Windows Tip: Mounting a stage directory

Here is a quick tip on how to mount Windows shares in a Linux environment. I mention this as a VMware tip because I see alot of people transferring source files to their VMware image by launching a browser within the vm or via ftp.

If the product your installing is fairly large this could inflate your vmware image, taking up more room on your hard drive. If you take snapshots or back them up, then thats space can add up. As well for products like R12, the stage directory is just under 40GB. Thats not something your going to want to store inside your VM.

I have one directory on my system which contains all the products I have downloaded including R12 for Linux, various versions of Oracle for different OS’s and patches. I share out this directory via Windows (right click on the folder name followed by “Share…” (Vista)) and mount it within the virtual machine by executing the following command:

mount -t cifs //192.168.0.100/R12 -o username=dave,password=mypass /mnt/Stage

Note: make sure /mnt/Stage is an empty directory otherwise the mount will fail and that your kernel supports CIFS. The username and password above are that of my Windows account. //192.168.0.100/R12 would be my laptops IP address and the Windows share name.

Monday

ORA-00600 during adcfgclone.pl dbTier

While cloning a new environment (to me) today I hit the following error:

ORA-00600: internal error code, arguments: [skkxerrp], [skkxdllload],
[SlfFopen], [/u001/CRP1/oracle/crp1db10g/10.2.0/plsql/nativelib/d66/STANDARD__SYS__S__647.so], [No such file or directory], [], [], []


A search of metalink will result in a single hit, NOTE:382767.1. The note mentions two possible solutions:
  • Setup native PL/SQL before cloning
  • Modify the rapid clone template file to remove two plsql parameters.
Well, in this case i'm told the production environment has always had pl/sql native compilation, so number 1 didn't apply. If I performed the second potential solution then my newly cloned environment wouldn't be identical to production until I re-setup native compilation.

When I looked at the template file ($ORACLE_HOME/appsutil/template/afinitdb_102.ora), I noticed that by default the parameter plsql_code_type gets reset to INTERPRETED. I'm not sure why this happens, I would have assumed it would be set to the production value of NATIVE. So instead of performing the solutions described in the metalink note I change plsql_code_type to native and re-executed adcfgclone.pl dbTier, which this time completed without error.

Sunday

VMWare Tip – Installing an OS from ISO images

I tend to install OS's quite a few times to rebuild environments or try a new version. Previously I would download the ISO's and burn them to cd/dvd but a little while ago a colleague mentioned that Vmware was capable of reading directly from ISO files via the CD-ROM device.


This is pretty simple to do and I wish I had known about it earlier, it would have saved me some hassle. The following is a simple VM which I am going to use for an E-Business Suite R12 environment.


image


Double click on the CD-ROM device and the following window will appear:

image


Select “Use ISO image”, click on the Browse button and select an ISO image. I am installing OEL R5 Update 2, so I browsed to my stage directory and selected the first ISO file:

image


Now the CD-ROM device screen should look like:

image


Note the CD-ROM dvice back in the VM tab:

image


Now start the VM and after a few moments you should be brought to the Enteprise Linux boot screen:

image


If the software you are trying to install has multiple ISO files, at some point during the installation you will be prompted for the next disk. For example, installing OEL5.2:

image


All we have to do is point the CD-ROM device to the next ISO image, in this case disc 2. In the toolbar, at the top of the VMware Server Console window, click on VM -> Settings and the following screen will appear:

image


Highlight CD-ROM and on the right hand side click on the Browse button and select the disc2:

image


After you click on the Open button you will be brought back to the Virtual Machine Settings screen. Click on the OK button. You will now be back in your vmware guest OS which is prompting you for the next CD. For OEL5, click on the OK button and the installation will continue. If there are additional ISO files, then just repeat this process when prompted for the next CD.

Monday

Merging Patches in E-Business Suite

One method to decrease the amount of time it takes to apply a large number of patches is to use AD Merge. AD Merge allows you to combine multiple patches into a single patch. If you have applied multiple patches separately in the past, you've probably noticed that some steps may be repeated for each patch. For example, autoconfig, compiling JSP or database objects, etc may be executed automatically multiple times. You can pass parameters in to adpatch to avoid and perform those tasks manually at the end. As well, even tho its minor, just running through the adpatch prompts for each patch adds up.. (I'll talk about defaultsfile in another post.)

There are some restrictions with AD Merge, it can't be used to merge patches of different releases, platforms or parallel modes.

The first step is to download the patches and uncompress them into a single directory. For the following example I am using the July Security patch release:

oravis@myserver=> ls SRC
6520998 6884665 p6845529_11i_GENERIC.zip
6627387 p6520998_11i_GENERIC.zip p6884665_11i_GENERIC.zip
6845529 p6627387_11i_GENERIC.zip

Execute admrgpch. (I created a directy DEST at the same level as SRC above). The format i'm using below is: -s <source> -d <desintation> -logfile <name> -merge_name <default is merged, so name it appropriately>:

oravis@myserver=> 
admrgpch -s SRC -d DEST -logfile JUL09_merge.log -merge_name jul09cpu_merge


Executing the merge of the patch drivers
-- Processing patch: SRC/6520998
-- Done processing patch: SRC/6520998

-- Processing patch: SRC/6627387
-- Done processing patch: SRC/6627387

-- Processing patch: SRC/6845529
-- Done processing patch: SRC/6845529

-- Processing patch: SRC/6884665
-- Done processing patch: SRC/6884665


Copying files...

100% complete. Copied 9 files of 9...

Character-set converting files...

4 unified drivers merged.

Patch merge completed successfully

Please check the log file at JUL09_merge.log.


oravis@myserver=> ls DEST
6520998_README.html b6520998.ldt fnd
6520998_README.txt b6627387.ldt ibe
6627387_README.html b6845529.ldt j6520998_mwa.zip
6627387_README.txt b6884665.ldt j6627387_ibe.zip
6845529_README.html f6520998.ldt j6884665_frm.zip
6845529_README.txt f6627387.ldt jcopy
6884665_README.html f6845529.ldt u_jul09cpu_merge.drv
6884665_README.txt f6884665.ldt

Finally review the merge log file and verify that there were no errors. I've read that you shouldn't merge AD or FND patches but I can't find anything official on Metalink or in the documentation. AD Merge has only failed on me twice. Once it failed during the merge and another time during the application of the merged patch. When applying the patch with adpatch, change directory into DEST and when prompted use u_jul09cpu_merge.drv for the driver name. Don't forget to perform any post-patch activities that may be required for each patch!

Thats it, merging patches is pretty simple. It has worked great for me in the past and even for small patching efforts like the CPU release above, I use it. Even tho they are pretty quick patches it beats having to apply each one manually.

Thursday

A New Record! Umm.. what comes after Trillion?!

For those that don't know, quadrillion comes after trillion. I had to look it up....

What do you get when you add together:
  • cost of 2,652,527,734,267
  • cpu cost of 729,606,778,262,148,864
  • order by on 200,474,167,178 rows
  • 87 full table scans
  • 5 merge join cartesian
One nasty query!

The following screenshot was taken today and has officially taken first place in my record books!

Wednesday

Cleaning up the FND_NODES Table.

After a clone, you may notice that FND_NODES still contains entries for the source system. You may also see the same thing if you relocate services to a new node. You can query FND_NODES but an easy way to see this is via OAM (Oracle Applications Manager) on the opening overview screen:

(Hostnames blanked for obvious reasons..)


This particular environment has a single application tier and database tier, which means there are 7 extra rows. Note:260887.1 details how to clean up the FND_NODES table (11.5.10-12.0.x) and its very easy to do if your on the latest TXK Autoconfig rollup patch.

Here are the steps:

  • Verify you have at least the TXK AUTOCONFIG ROLLUP PATCH Q (JUL/AUG 2007), patch number 5985992. My environment is a bit out of date so I applied the latest rollup patch S from April/May 2008, patch number 6372396. Personally, if a patch has been replaced I try to go with the latest unless there are too many pre-requisites. In the past i've been bitten by applying the minimum requirement only to have to apply the latest version a little while later. So if its not much more effort, it makes sense to do it.
    • The patch took about 2 hours to apply.
    • NOTE: Make sure you review the README file for this patch. If you have manually added product tops you may need to apply another patch. As well there are a few post-steps but the main one is to refresh the RDBMS AutoConfig files:

      Create the appsutil.zip file by executing:
      $ADPERLPRG $AD_TOP/bin/admkappsutil.pl
      (On Windows: %ADPERLPRG% %AD_TOP%\bin\admkappsutil.pl)
      This will create appsutil.zip in $APPL_TOP/admin/out .

      Copy/ftp the appsutil.zip file to your RDBMS server and:

      cd $ORACLE_HOME
      unzip -o appsutil.zip
      execute AutoConfig:
      $ORACLE_HOME/appsutil/scripts/<context_name>/adautocfg.sh


  • From sqlplus execute the following command:

    SQL> EXEC FND_CONC_CLONE.SETUP_CLEAN;
    COMMIT;

    This deletes data from a few FND tables such as FND_NODES but after AutoConfig has been executed they will contain the correct values.
  • Run AutoConfig ($COMMON_TOP/admin/scripts/<context_name>/adautocfg.sh) on each tier.
  • Startup the environment.


You should now have a nice and clean FND_NODES table:


So why would you want to do this? Personally it just annoyed me seeing incorrect values in OAM. As well, seeing production information in a cloned environment always makes me uneasy. There are other reasons as to why you would want to or may have to do this. If you search Metalink for FND_CONC_CLONE.SETUP_CLEAN you will get a couple of dozen hits. Quite a few notes are related to cloning, clean up or services not starting properly.

There you go, now you have a nice clean FND_NODES table!

Tuesday

Adpatch seems to hang?

While applying a patch to a cloned environment adpatch seemed to hang on the following line:

Attempting to instantiate the current-view snapshot...

If you perform a search of metalink you will get a couple of hits which may solve your problem. One of the problems is that the AD module level is lower than the required version for the patch. The other note mentions that it could be a temp tablespace issue. In my case, both of those checked out ok.

Before I continue, what is a snapshot?

There are two types of snapshosts, APPL_TOP and global. APPL_TOP snapshots contain version of files and patches applied within that APPL_TOP. A global snapshot contains the same information but for the entire environment, ie. all APPL_TOPS.

The global view snapshot is used when you use Patch Wizard to determine whether or not a patch has been applied. APPL_TOP snapshots are using by autopatch (adpatch) to determine if all prerequisite patches have been applied. Each time you apply a patch AutoPatch updates the current view snapshot. I believe it may even create a new current view snapshot and just replace the existing one.

Additionally there are two types of snapshots, current view and named. A named snapshot is just a copy of the current view snapshot at a given point in time. Patch wizard and AutoPatch use current view snapshots.

To access snapshot information launch adadmin, select option 2 - Maintain Applications Files menu, select 5 - Maintain snapshot information and you will see the menu below:


Maintain Snapshot Information
-------------------------------------------

1. List snapshots

2. Update current view snapshot

3. Create named snapshot

4. Export snapshot to file

5. Import snapshot from file

6. Delete named snapshot(s)

7. Return to Maintain Applications Files menu


Back to the problem of adpatch seeming to hang while instantiating a current-view snapshot. Since this is a cloned environment, a snapshot doesn't exist yet for the APPL_TOP. So before AutoPatch can check if prerequistite patches have been applied, it must create a snapshot. This process can take 1-2 hours depending on how fast your servers are. You can avoid this by running "Update current view snapshot" via adadmin after you clone.

I should add, that in my experience I've only encountered this problem a few times. Most of the patches I apply to a cloned environment are quick one-offs with no pre-reqs. Large patching efforts such as family packs or patches with pre-reqs may experience this problem. I haven't tried, but if your crunched for time you may be able to bypass adpatch updating the current view snapshot by specifying "adpatch options=noprereq" to skip the prerequisite check.

Sunday

Monitoring Forms sessions in OAM

One of the monitoring features of OAM, Oracle Applications Manager is the ability to view forms sessions and details about them. Login to OAM and proceeed to the Applications Dashboard -> Performance (tab). You will see a summary of activity similiar to the following:


Note: If you see a 0 next to "Forms Sessions" your environment may not be setup correctly. Skip down to the bottom of this post. As well, I've blanked out alot of information that may be sensitive. I'm in the process of setting up an R12 demo environment and once that is done take screenshots from there so I don't have to worry about making the company I work for mad.

From there you can click on the link to the right of "Forms Sessions" and you will be brought to a page similar to the following:


On this page you will see a list of the forms sessions, the usernames of those who launched the form, responsibility used. As well as an indication of how much resources the form is consuming such as memory, cpu, and IO. From here you can drill down into each forms session by clicking on a link in the AUDSID column or by selecting the row and click on the "Session Details" button. That will bring you to a screen similar to the following:


This page will provide you with more session information (sid, serial#, etc) and session wait statistics. If you'd like to collect more information about this session you can also enable tracing and view the output.

Very useful.

Forms Sessions showing a 0?


Check the profile option "Sign-on: Audit level" and make sure it is set to "Form". This is required in order to monitor forms sessions.

In case your curious, there are 4 valid values for this profile option: None, User, Reponsibility and Form. As you progress from None to Form additional information is collected and stored.

  • None - Obvious, nothing is audited.
  • User - FND_LOGINS table gets updated with one record per user session.
  • Reponsibility - Same as User, as well, FND_LOGIN_RESPONSIBILITIES will be updated with 1 record for each responsibility used during the session.
  • Form - Same as user and responsibility, plus FND_LOGIN_RESP_FORMS will be updated with one record for each form selected during the session.
As with any audting, you should determine how long you require the data and purge/archive it. In order to purge data in the above tables you need to schedule the concurrent program, "Purge Signon Audit Data". This program requires one parameter, Audit Date. All data older than this date will be deleted. Note: this program deletes data in the above tables as well as FND_UNSUCCESSFUL_LOGINS.

Beware: Enabling auditing does have a slight impact on performance.

Note: Purge Signon Audit Data executes $FND_TOP/sql/FNDSCPRG.sql

Thursday

ORA-01555 and Automatic Undo

In the past couple of years of support Oracle E-Business Suite I have only hit ORA-01555: snapshot too old twice... About a year ago and again today.

Before you start to troubleshoot you need to gather some information:
  • If your unaware of the current settings for undo you should check. One way is to use the show parameter command but you can also check the database initialization parameter file or spfile.


    SQL> show parameter undo

    NAME TYPE VALUE
    ------------------------------------ ----------- -------------
    undo_management string AUTO
    undo_retention integer 1200
    undo_suppress_errors boolean FALSE
    undo_tablespace string APPS_UNDOTS1


  • Determine which time the error occurred from the alert log, which will help you narrow down the time for a query we will use later. You alert log should have an entry similiar to:

    Sat Aug 16 23:05:41 2008
    ORA-01555 caused by SQL statement below (Query Duration=1506 sec, SCN: 0x0000.a8d6d835):
    Sat Aug 16 23:05:41 2008
    SELECT X FROM Y WHERE A=B

Now that you the automatic undo settings and the time of the error execute the following query (substitute the timestamp of the error in your alert log in place of the one below, with some buffer at either end):

SQL> select to_char(begin_time,'MM/DD/YYYY HH24:MI') begin_time, UNDOBLKS, UNXPSTEALCNT, EXPSTEALCNT ,
SSOLDERRCNT, NOSPACEERRCNT, MAXQUERYLEN
from v$undostat
where begin_time between to_date('08/16/2008 22:30:00','MM/DD/YYYY HH24:MI:SS')
and to_date('08/16/2008 23:30:00','MM/DD/YYYY HH24:MI:SS')
order by begin_time;


BEGIN_TIME UNDOBLKS UNXPSTEALCNT EXPSTEALCNT SSOLDERRCNT NOSPACEERRCNT MAXQUERYLEN
---------------- -------- ------------ ----------- ----------- ------------- -----------
08/16/2008 22:32 10394 0 0 0 0 513
08/16/2008 22:42 5693 0 0 0 0 212
08/16/2008 22:52 10853 0 0 0 0 451
08/16/2008 23:02 8950 0 0 0 0 1653
08/16/2008 23:05 11284 0 0 1 0 1506

5 rows selected.


Based on this query we can determine a couple of things such as the number of transactions which required UNDO during the time period. How many undo blocks they required and whether there were any (successful) atempts to steal undo space from other transactions.

The query also shows which transactions received ora-1555 errors (SSOLDERRCNT) and whether or not there was enough space in the UNDO tablespace (NOSPACEERRCNT). If you look at the row above with a timestamp of 23:05, this is the transaction which produced my ora-1555 error. We know this because the SSOLDERRCNT column for this row has the value 1 and the timestamp is the same as the one in the log file. Since the MAXQUERYLEN for this transaction (1506) is greated than the undo_retention (1200) one solution would be to increase undo_retention.*

*There are other ways to solve this problem to try and avoid ora-1555 errors such as transaction tuning, etc. More detail can be found in Note:10630.1

For this particular case I will set it to 2000 and monitor the undo tablespace. By increasing undo_retention undo is kept for a longer period of time, so you should monitor the undo tablespace to make sure you have enough room. Oracle 9i+ has advisors which can help you determine the impact of raising undo_retention. The following screen shot is taken from Oracle 9i Enterprise Manager but you can also find better graphs in 10G Database or Grid Control:


*Note: this graph is not from same database as above. Its just for informational purposes.

We can determine from this graph if we were to double undo retention from 30 to 60 minutes we would need at most 70MB of space. This estimate is based on undo activity since the database was initially started.

If the UNDO tablespace was too small, you would see a value in the NOSPACEERRCNT column. Take a look at the following row with a timestamp of 23:22:


BEGIN_TIME UNDOBLKS UNXPSTEALCNT EXPSTEALCNT SSOLDERRCNT NOSPACEERRCNT MAXQUERYLEN
---------------- -------- ------------ ----------- ----------- ------------- -----------
08/16/2008 23:22 1034 10 0 1 1 1428

This row has a values for UNXPSTEALCNT and NOSPACEERRCNT. This means the transaction was not able to obtain space from the UNDO tablespace and attempted to steal 10 blocks (UNXPSTEALCNT) from other transactions. In this case we need to add space to the UNDO tablespace because it was not large enough to meet the undo_retention requirement.

Tuesday

Statistics, Concurrent requests and Terminations

There is a script on Metalink which can help you automate gathering statistics for an E-Business Suite environment. As you are probably aware in an EBS environment you have to use FND_STATS or some predefined concurrent programs such as "Gather Schema Statistics".


Subject: coe_stats.sql - Automates CBO Stats Gathering using FND_STATS and Table sizes
Doc ID: Note:156968.1


This note contains a script which verifies statistics and generates a script and report which lists all the tables that need to be analyzed. Beware that coe_stats.sql automatically executes the dynamic script coe_fix_stats.sql script at the end of its execution. So make sure you comment out the line "START coe_fix_stats.sql" if you don't want this to happen.

The report generated also contains some information about the table. If its partitioned, number of rows (at the time it was last analyzed), sample percent, etc.. As well as "Days since last analyze". Immediately I noticed that the time since the tables were last analyzed was over a week. Our main Gather Schema Statistics job is scheduled to run every weekend.

What does this have to do with terminations? In a previous post I mentioned that our environment crashed as a result of bug 5907779. This happened as our weekly concurrent request to gather statistics was running. After the environment was bounced this job restarted but it was now during business hours. Statistics should always be gathered at periods of low activity because it causes performance issues. So I canceled the request via OAM, which changed the status to Phase: Completed, Status: Terminated.

The side affect to terminating a job, which had slipped my mind* is that it will not be rescheduled. I'm not sure why that happens, it doesn't make much sense to me but it appears to be by design. The solution is to reschedule the job.

* Apparently 8hrs of sleep in the past 72hrs can have that affect. Partly due to a last night out while on vacation, traveling, falling ill and being paged at 3am.

In summary, the goal of this post was to point out a useful metalink note and refresh your memory to reschedule canceled requests if you need them to run again.

Friday

A Smart Performer

Alex asked a question on his blog, "As a Manager who would you prefer - a smart performer or a hard worker?" I am not a manager but my personal preference would be to work with a smart performer. Over the past 10 years i've probably worked with over 100 dbas, so its probably safe to say i've seen a pretty broad range of expertise.

I personally find hard workers who don't produce results, frustrating to work with. At the end of the day, if I consistently have to solve issues then they add no value. I might as well do it all myself. I should add, I expect questions as a senior DBA since thats part of the job. But I expect junior level questions from junior members of the team, not senior. They say there is no such thing as a stupid question and I agree. However, if your a senior resource then you should be able to find the answer to junior questions very quickly yourself.

This debate has cropped up on mailing lists, forums many times over the past year. The general consensus seems to be that managers prefer a hard worker who has social skills vs a smart performer who may be a little socially inept. I've worked with my share of socially inept DBA's and even tho at times they can make you feel like dirt stuck in the crack of their shoe, at least there is an opportunity to learn from them. Usually these DBA's have that attitude for a reason and most times its because of managements inability to 'fix' hard workers who produce no results or consistently repeat past mistakes.

So to answer Alex's question, "Or a fireman who has a smart solution, extinguishes the fire in two hours and saves most of your house. Which one do you choose?" I choose the the fireman who saves my house, even if he curses on me for being a moron while doing so.

Tuesday

Everyone Has One

Everyone has an environment that they are tasked with supporting but dread the day a call comes in. For me is an old 10.7 environment which we have for historical purposes. I'm not exactly sure how often users need to run reports in there but i'd say a few times a month. I dread supporting this environment because I have never used 10.7... When I joined this group we had been using 11i for a few years. Since then, the only people who knew anything about 10.7 have left the company.

Recently we received a call that users could not connect. To make a long story short we had to restore the application server from a backup. I wish I could tell the story because its hilarious but suffice to say i've seen a few bloggers lose their jobs for posting too many environment specific details. Better safe than sorry.

Luckily I was going on vacation the day after we requested the restore and I was hoping it would all be resolved by the time I returned. No such luck. Once the server was ready for us I logged in to restart the services expecting no issues. No suck luck. Executing owsctl produced the following error:


> Error initializing CORE
> Please check if the ORACLE_HOME is set correctly.


Great. Luckily there is a 7 year old, archived document on Metalink which pointed me in the right location: Note:1015720.101 The note refers to changing
the location of your ORACLE_HOME but symbolic links under $ORACLE_HOME/ows/mesg were not updated correctly to the new location.

Well, in this case everything should be identical but with no other hits on Metalink its was my only option. Indeed the symbolic links were pointing to an invalid location. When the unix admin restored the files he had to put them in a temporary location first and copy them over. The restore process must have recreated the symbolic links because they were still pointing to that temp location.

Sweet, I found the solution so I fired up the startup scripts again.. No suck luck. Now I faced the following error:


OMN-2001, could not contact address server
Information: Application init function oracle_adp_init returned ADI_FATALINIT
Error: The server could not initialize
Information: The server is exiting
OWS-08811: Unable to startup Oracle Web Listener `xyz01'.


This time Note:1016600.102 came to my rescue. OMN-2001 means the admin process was started before the WRB (web request broker). Solution, start WRB before admin. Then I could process to starting the listener.

While the first problem was as a result of the restore, the second could have been avoided with good documentation. Now that I know the proper order to start the services (wrb, admin, listener) I found the correct startup scripts.

Friday

DB2 No More

A couple of posts ago I mentioned that the majority of my time was going to be spend learning DB2. I also mentioned I was going to put some feelers out internally to see if any Oracle Apps jobs were out there. So over the past few weeks I networked quite a bit and with luck I managed to find an opening. This week I start part time in an Oracle Applications DBA group and hopefully as integration work slows down i'll spend more and more time over there.

So now I can dedicate my free time to learning more about Oracle Apps (which hopefully means more blog posts) instead of ramping up on DB2.

Tuesday

Security Patch Woes

A few weeks ago we applied a number of security patches. Due to various reasons we were a bit behind schedule and had to push a couple of releases out to production. Since then we have encountered 3 bugs, one of which crashed production just before month end. 2 of the bugs were the result of upgrading to 10.2.0.3 (a requirement for the security patches). The other was a bug on top of ATG_PF.H.5

Problem 1:

After cloning, Concurrent Managers fail to start. As per Note:434613.1, this problem exists on top of ATG_PF.H delta 5 and delta 6, as well as R12. During cloning neither the service manager or the internal monitor are created thus the concurrent managers will not start. A patch has been published to resolve this issue and there is a very easy workaround. We have added the patch to the next release cycle and modified our cloning scripts to incorporate the workaround.

The interesting part about this problem is that we have been on ATG_PF.5 since Dec when we upgraded to 11.5.10.2. Since then we have cloned a test environment over 200 times (its rebuilt nightly) and did not encounter this bug. We did hit it once back in March for a one off clone, but since then we have recloned that environment plus many others multiple times and it didn't resurface. I find it interesting that now after upgraded to 10.2.0.3 (from 10.2.0.2) and applying security patches that we can reproduce the problem consistently.

In retrospect we should have added this patch to the release cycle but we tend not to recommend that unless a problem can be consistently reproduced.


Problem 2:

Users stopped receiving email notifications from workflow. The following error could been seen in the logs:

ORA-06502:

PL/SQL: numeric or value error: associative array shape is not consistent with session parameters


A quick search turned up bug 5890966 which mentions this problem could occur during periods of high activity. Once we encountered this bug emails ceased to be sent. Oracle confirmed that this is a mandatory patch for 10.2.0.3 but has not been published as such yet.

Thanks to the next problem tho, we had to restart our environment and the problem hasn't reoccurred yet. We have added the patch to the next release cycle and hopefully it won't reoccur before then.

Problem 3:

On 10.2.0.3 bug 5907779 can cause sessions to self hang if dbms_stats is executing... I recall reading a few blog posts about this particular error but since it wasn't recorded as a mandatory patch we didn't apply it. At least the blog posts helped me identify the problem quickly.

Our statistics gathering jobs are scheduled on weekends and in this particular case only 1 type of session was hanging as a result of this bug. This session was spawned by an integration which is scheduled to execute once every few minutes. Unfortunately it wasn't smart enough to detect previous instances were still running and of course isn't monitored on weekends.

So as the weekend wore on, more and more sessions consuming more and more resources accumulated in the database. We didn't realize there was a problem until Sunday night when APO users came online. Unfortunately by then it had progressed to the point where the system ran out of resources, sessions couldn't be killed and we had to reboot the server. Luckily I was able to capture enough information (hang analyze and system state dumps) to confirm that bug 5907779 was the culprit. Everything came back up properly and as a bonus temporarily fixed our workflow email issues.


Unfortunately these types of problems (at least number 2 and 3) are not likely to surface in a test/dev environment. We have some patch review meetings coming up over the next few days to re-examine our processes but i'm not sure how we can prevent these types of problems in the future. Note:401435.1 lists a number of issues specific to 10.2.0.3. I guess I could have analyzed each of those patches to determine if they were applicable to our environment but whats to say they wouldn't have introduced additional bugs? Even then, I would have only prevented one issue since the workflow patch isn't listed in that note. Normally I just review Note:285267.1 which is the EBS 11i and Database FAQ to make sure there are no known issues.

Feel free to leave a comment describing how you analyze patchsets and full releases...

iProcurement: Catalog Bulk Load

Just over a year ago we implemented Shared Application Filesystem in our EBS environment. This reduced maintenance time by my guesstimate of 25-50%. Its hard to say exactly how much time we have saved but previously we would have to apply a patch to two application tiers (web, forms) and a database tier (cm, db). If patches took an equal amount of time per tier it would be easy to say how much time we have saved but typically patches on the database tier take longer to apply.

One of the modules we have implement is iProcurement and as part of that, periodically catalog data has to be uploaded. Catalog data consists of items available and their prices. To peform this task a user with the "Internet Procurement Catalog Administration/eContent Manager" responsibility has to select a file on their system and load it via the "Bulk Load Items & Price Lists" screen.

Behind the scenes the catalog data file is stored as a temporary file on the application tier. The POXCDXBL concurrent request starts and if it detects the node names for the cm tier and application tier are different it executes a file transfer, regardless of whether or not you are using a shared filesystem. In order for you to take advantage of the shared file system you need to apply patch 4656509 which upgrades RemoteFile.java to version 115.4 and set the profile option "POR: Catalog bulkload Directory" to a location on your share.

At the time we implemented Shared Application Filesystem we investigated this but it would have required alot of patching. At least 11 patches, with some of them being family packs. Even tho our POR profile option (listed above) was set to a local directory, catalog bulk load was working fine. So we decided not to change the configuration as it would require alot of testing.

Skip ahead almost two years, with alot of changes in between, and this configuration was still working until we applied the Oct 07, Jan 08 and Apr 08 security patches. During testing users reported that catalog bulk load failed:


POXCDXBL module: Catalog Bulk Load - Items & Price Lists failing with:

{true,/apps/appsvis/visappl/fnd/11.5.0/secure/myserver_vis.dbc,1,1,0}]
https://myappserver.cognos.com:8005/OA_CGI/FNDWRR.exe?temp_id=2964546434
null
oracle.apps.fnd.cp.request.FileAccessException
at oracle.apps.fnd.cp.request.RemoteFile.getFile(RemoteFile.java:441)
at oracle.apps.icx.loader.LoadRequest.runProgram(LoadRequest.java:51)
at oracle.apps.fnd.cp.request.Run.main(Run.java:161)
[6/12/08 3:11:02 PM] ********** Loader stopped **********


At first I assumed it was a cloning issue so I checked some typical problems we have experienced in the past. I noticed a few things that were wrong such as adovars.env settings, an error in our apache error_log file (below) and a few others but fixing them didn't resolve the error. I spent a fair bit of time on the apache SSL error because I had seen that in the past and it usually meant the txkrun.pl script to enable SSL failed for some reason. I re-executed it but the error did not go away (although, it did fix another problem). (As an aside, I have to say, debugging someone elses clones is a nightmare, especially if they didn't log everything.)


[Wed Jul 2 13:07:13 2008] [notice] caught SIGTERM, shutting down
[Wed Jul 2 13:07:24 2008] [notice] FastCGI: process manager initialized (pid 17232)
[Wed Jul 2 13:07:25 2008] [notice] Oracle HTTP Server Powered by Apache/1.3.19 configured -- resuming normal operations
[Wed Jul 2 13:10:34 2008] [error] mod_ssl: SSL handshake failed (server
myappserver.cognos.com:8005, client 10.69.92.24) (OpenSSL library error
follows)
[Wed Jul 2 13:10:34 2008] [error] OpenSSL: error:14094416:SSL routines:SSL3_READ_BYTES:sslv3 alert certificate unknown
Terminated


Moving on, Note:281530.1 talks about this feature and how it works behind the scenes in great detail. It also includes typical problems that may be encountered, workarounds and potential fixes. Using this note I narrowed down our problem to be at the point where the CM requests the catalog temp file from the application tier and places it in the CM tiers $APPLTMP directory. However, this file was of zero size.

At this point we decided to change the "POR: Catalog bulkload Directory" profile option to a directory on our shared filesystem and retest. This solved the issue. An SR with Oracle couldn't confirm whether or not the problem was caused by the security patches. So for now we will put this change into our release instructions since it is a better configuration (why transfer the file if can be available locally?). We have to apply the patches to one more environment before we go live and I will test catalog bulk loads before and after we apply the patches to see if they were the cause or it was indeed a cloning issue.

Monday

Branching out?


A few months ago our company was acquired.... Since I support our Oracle EBS environment it was a pretty safe assumption that at some point it would be decommissioned.  As with all acquisitions, redundancies are the first to disappear.

Add to the fact that they use SAP and DB2, I have some choices to make.    However, there are a couple of areas where I may be able to fit in, mostly the consulting branch but at least i'd still be able to focus on Oracle.

The majority of my time is now spent ramping up on DB2, while the remainder is supporting our EBS environment until the transition is over.   This makes it much more difficult to find topics to write about and its pretty much the reason why I haven't posted very much lately.

I have to say tho, learning another rdbms is a great way to refresh my knowledge of Oracle.    The book I am using to learn DB2 is aimed at Oracle DBA's, so as it describes a feature in DB2 it relates it to Oracle.  This makes it much easier to learn while at the same time refreshing my memory.

For the time being i'll be focusing on DB2 and I decided to start a blog related to that.  I'm also putting some feelers out internally hoping an Oracle Apps DBA job opens up...

Tuesday

ORA 24323 - Report Builder

Yesterday we encountered a weird issue with Report Builder. One of the developers, while working on a report, encountered the following error:

ORA-24323: value not allowed
==> select * from mytable

Report Builder: Release 6.0.8.27.0 - Production on Thu Jun 12 10:10:05 2008

(c) Copyright 1999 Oracle Corporation. All rights reserved.

Enter Username:
Program exited with status 1
Concurrent Manager encountered an error while running Oracle*Report for your concurrent request 4792266.

Review your concurrent request log and/or report output file for more detailed information.


The developer proceeded to make several changes but received the same error. Then they pulled up other reports and the error occured there as well. They contacted us thinking that there may be something wrong with the environment.

I have never used Report Builder but a quick search turned up 2 possible solutions:

1. A mandatory value received incorrect or null data.
2. Your not connected to the database in report builder.

I asked the developer to verify that the SQL they were working on was valid by pasting it into sqlplus and executing it and to verify that they are connected to the database.

A short while later they let me know that once you receive the error above, it seems Report Builder loses connection to the database. At that point they have to reconnect and if the query is fine they no longer receive the error.

Thursday

Refreshing an 11i Database using Rman

In order to facilitate troubleshooting we maintain a test environment which is a nightly copy of our 11i production environment. Since this environment is usually used to test data fixes it has to be as up to date as possible. To perform the database refresh we use rman's duplicate feature.

The goal of this article isn't just to provide the entire set of scripts and send you on your way. I think its safe to say that most EBS environments aren't identical, so its not like you could take them and execute with no issues. Instead i'll highlight the steps we follow and some of the key scripts.

NOTE: This doesn't include any pre-setup steps such as, if this is the first time duplicating the database make sure you have the parameters db_file_name_convert and log_file_name_convert specified in your test environments init file.

  • Step 1: Shutdown the test environment. If you are using 10g then remove any tempfiles. In 10g, rman now includes tempfile information and if they exist you will encounter errors. Check this previous post. Startup the database in nomount mode.
  • Step 2: Build a Rman Script. There are a couple of ways to recover to a point in time and we have decided to use SCN numbers. Since this process needs to be automated, we query productions rman catalog and determine the proper SCN to use and build an rman script. Here it is:

    set feedback off
    set echo off
    set serverout on
    spool $HOME/scripts/prod_to_vis.sql
    declare
    vmax_fuzzy number;
    vmax_ckp number;
    scn number;
    db_name varchar2(3) := 'VIS';
    log_file_dest1 varchar2(30) := '/dbf/visdata/';
    begin
    select max(absolute_fuzzy_change#)+1,
    max(checkpoint_change#)+1
    into vmax_fuzzy, vmax_ckp
    from rc_backup_datafile;
    if vmax_fuzzy > vmax_ckp then
    scn := vmax_fuzzy;
    else
    scn := vmax_ckp;
    end if;
    dbms_output.put_line('run {');
    dbms_output.put_line('set until scn '||to_char(scn)||';');
    dbms_output.put_line('allocate auxiliary channel ch1 type disk;');
    dbms_output.put_line('allocate auxiliary channel ch2 type disk;');
    dbms_output.put_line('duplicate target database to '||db_name);
    dbms_output.put_line('logfile group 1 ('||chr(39)||log_file_dest1||'log01a.dbf'||chr(39)||',');
    dbms_output.put_line(chr(39)||log_file_dest1||'log01b.dbf'||chr(39)||') size 10m,');
    dbms_output.put_line('group 2 ('||chr(39)||log_file_dest1||'log02a.dbf'||chr(39)||',');
    dbms_output.put_line(chr(39)||log_file_dest1||'log02b.dbf'||chr(39)||') size 10m;}');
    dbms_output.put_line('exit;');
    end;
    /
    spool off;

    This script produces a spool file called, prod_to_vis.sql:

    run {
    set until scn 14085390202;
    allocate auxiliary channel ch1 type disk;
    allocate auxiliary channel ch2 type disk;
    duplicate target database to VIS
    logfile group 1 ('/dbf/visdata/log01a.dbf',
    '/dbf/visdata/log01b.dbf') size 10m,
    group 2 ('/oradata/dbf/visdata/log02a.dbf',
    '/dbf/visdata/log02b.dbf') size 10m;}
    exit;
    Note: Our production nightly backups are on disk which are NFS mounted to our test server.

  • Step 3: Execute the rman script. Launch rman, connect to the target, catalog, auxiliary and execute the script above:

    ie.
    rman> connect target sys/syspasswd@PROD catalog rmancat/catpasswd@REPO auxiliary /


    You may want to put some error checking around rman to alert you if it fails. We have a wrapper script which supplies the connection information and calls the rman script above. Our refresh is critical so if it fails we need to be paged.

    rman @$SCRIPTS/prod_to_vis.sql
    if [ $? != 0 ]
    then
    echo Failed
    echo "RMAN Dupcliate Failed!"|mailx -s "Test refresh failed" pageremail@mycompany.com
    exit 1
    fi


  • Step 4: If production is in archivelog mode but test isn't, then mount the database and alter database noarchivelog;
  • Step 5: If you are using a hotbackup for cloning then you need to execute adupdlib.sql. This updates libraries with correct OS paths. (Appendix B of Note:230672.1)
  • Step 6: Change passwords. For database accounts such as sys, system and other non-applications accounts change the passwords using alter user. For applications accounts such as apps/applsys, modules, sysadmin, etc use FNDCPASS to change their passwords.

    ie. To change the apps password:

    FNDCPASS apps/<production appspassword=> 0 Y system/<system_passwd> SYSTEM applsys <new apps passwd>

  • Step 7: Run autoconfig.
  • Step 8: Drop any database links that aren't required in the test environment, or repoint them to the proper test environments.
  • Step 9: Follow Section 3: Finishing Tasks of Note:230672.1
    • Update any profile options which have still reference the production instance.

      Example:

      UPDATE FND_PROFILE_OPTION_VALUES SET
      profile_option_value = REPLACE(profile_option_value,'PROD','TEST')
      WHERE profile_option_value like '%PROD%


      Specifically check the FND_PROFILE_OPTION_VALUES, ICX_PARAMETERS, WF_NOTIFICATION_ATTRIBUTES and WF_RESOURCES tables and look for production hostnames and ports. We also update the forms title bar with the date the environment was refreshed:

      UPDATE apps.FND_PROFILE_OPTION_VALUES SET
      profile_option_value = 'TEST:'||' Refreshed from '||'Production: '||SYSDATE
      WHERE profile_option_id = 125
      ;

    • Cancel Concurrent requests. We don't need concurrent requests which are scheduled in production to keep running in test. We use the following update to cancel them. Also, we change the number of processes for the standard manager.

      update fnd_concurrent_requests
      set phase_code='C',
      status_code='D'
      where phase_code = 'P'
      and concurrent_program_id not in (
      select concurrent_program_id
      from fnd_concurrent_programs_tl
      where user_concurrent_program_name like '%Synchronize%tables%'
      or user_concurrent_program_name like '%Workflow%Back%'
      or user_concurrent_program_name like '%Sync%responsibility%role%'
      or user_concurrent_program_name like '%Workflow%Directory%')
      and (status_code = 'I' OR status_code = 'Q');

      update FND_CONCURRENT_QUEUE_SIZE
      set min_processes = 4
      where concurrent_queue_id = 0;


  • Step 10: Perform any custom/environment specific steps. We have some custom modules which required some modifications as part of cloning.
  • Step 11: Startup all of the application processes. ($S_TOP/adstrtal.sh)

    NOTE: If you have an application tier you may have to run autoconfig before starting up the services.

Hopefully this article was of some use even tho it was pretty vague at times. If you have any questions feel free to ask. Any corrections or better methods don't hesitate to leave a comment either.

How to Determine your Forms Patchset Level

There are supposedly two ways to determine your forms patchset level. The first method is to launch a form and click on Help -> About Oracle Applications. According to Note:74647.1 you should see it in the window that pops up. Maybe its just me, but I don't see it there.

Another method is to view the output by f60gen. Note:283985.1 provides a script which will determine the patchset level for you. You don't really need a script for it tho.

Execute f60gen and look at the first line:

oravisf@myserver=> f60gen
Forms 6.0 (Form Compiler) Version 6.0.8.27.0 (Production)


Subtract 9 from 27 and you'll have your patchset level. So I am on patchset level 18.

Friday

Part 4: (TAF) Transparent Application Failover and testing.


TAF, Transparent Application Failover is the ability for a connection to failover and reconnect to a surviving node. Transactions are rolled back but TAF can be configured to resume SELECT operations. Before you can use TAF you have to create a Service. Initially services were used for connection load balancing but over the years has developed into a method to distribute and manage workload across database instances. For more information on services see Oracles documentation:

http://www.oracle.com/technology/obe/10gr2_db_vmware/ha/rac/rac.htm

There are a few ways to create a service. You can use Grid Control, srvctl or dbca. For this exercise I am going to use DBCA.

Launch DBCA. Select Oracle Real Application Clusters database and click on next:

clip_image002[1]

Select Services Management and click on Next:

clip_image004[1]

RACDB should be selected, so click the Next button:

clip_image006[1]

On the following screen click on the Add button. When prompted for a service name enter RAC and click on the OK button:

clip_image008[1]

On the following screen verify both RAC instances (RACDB1, RACDB2) have the preferred option selected. Preferred means that the service will run on that instance when the environment first starts. An instance flagged as available means it will not run the service unless the preferred instances fail. Since this is a RAC environment we want users to be distributed between both nodes, thus they need to have the preferred option set.

The TAF policy is the failover settings. Select Basic. Basic means that the session is reconnected when a node fails. Preconnect means that a shadow process is created on another node in the cluster, to reduce time if there is a failure.

clip_image010[1]

Once the changes above have been completed, click on the finish button. A popup will appear prompting you to configure the services. Select OK.

clip_image012[1]
clip_image014[1]

Once the service configuration has completed, you will be asked if you’d like to perform another operation. After you select No, dbca will close.

clip_image016[1]

A check of the $ORACLE_HOME/network/admin/tnsnames.ora file will show the following new entry:

clip_image018[1]

Lets break down this new entry and highlight a few key lines:
Line 5: (LOAD_BALANCE = yes)
This line indicates that Oracle will randomly select one of the addresses defined on the previously two lines and connect to that nodes listener. This is called client-side connect-time load balancing.

Lines 9 -13: These lines are the TAF settings.

Line 10: (TYPE = SELECT)
There are two types of failover. SELECT indicates that the session will be authenticated on a surviving node but as well SELECT statements will be re-executed. Rows already returned to the client are ignored.
The other option is SESSION. In a SESSION failover, only the users session is re-authenticated.
Line 11: (METHOD = BASIC)
BASIC means that the session will not reconnect to a surviving node until the failover occurs.
PRECONNECT means a shadow process is created on a backup instance to reduce failover time. There are some additional considerations when choosing this setting so be sure to read up on it.

Line 12 and 13: (RETRIES = 180)
(DELAY = 5)
Self-explanatory, the maximum number of retries to failover and the amount of time in seconds to wait between attempts.

Testing TAF


Session 1: Login to the database via the service created above:

clip_image020[1]

Session 2: Login as sysdba and query gv$session to determine which instance Scott is connected to:

clip_image022[1]

Scott is connected to instance 2 (which resides on raclinux2), so lets shutdown that instance and see what happens. As sysdba, connect to RACDB2 and shutdown immediate. Once the instance has shutdown re-execute the query above to see which instance Scott is now connected to:

clip_image024[1]

Why hasn’t the session failed over? Because when node 2 was shutdown scott wasn’t executing a query. Re-execute the select count(*) from emp statement, then query gv$session again:

clip_image026[1]

If a session is inactive, it will not failover until another statement is issued.

Thursday

Part 3 - Issues and Resolutions

The following is a list of the issues and solutions for the problems I encountered while installing 10gR2 RAC , OEL5 on VMware. Some of the items below are things I tried but didn't resolve an issue but I thought might be interesting.

1. If you are using vmware on a slow computer, especially when 2 nodes are running, you may experience locking issues. If so, it could be timeouts for the shared disk. In your vmware config files add the following:

reslck.timeout="1200"

On the bottom right hand side of your vmware window you will see disk icons that will flash green when they are in use. If vmware hangs and any of the shared disks are green then this is probably the issue.

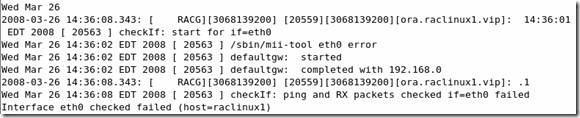
2. Eth0 has to be bridged or you will see the following running vipca or in your vip log:

Interface eth0 checked failed (host=raclinux1)
Invalid parameters, or failed to bring up VIP (host=raclinux1)

3. If during the install you didn’t disable the firewall, root.sh will be unable to start on the second node, raclinux2. If so, disable iptables by executing:

/sbin/service iptables stop

To disable this feature from starting after a reboot, execute the following as root:

/usr/sbin/system-config-services

Scroll down until you see iptables, if it is checked, remove the check then click on the save button. You can also stop the services from this program as well by highlighting iptables and clicking the stop button.

Subject: Root.sh Unable To Start CRS On Second Node Doc ID: Note:369699.1

4. The following two workarounds are already addressed in the installation guide but here they are for reference.

Subject: VIPCA FAILS COMPLAINING THAT INTERFACE IS NOT PUBLIC Doc ID: Note:316583.1
Subject: 10gR2 RAC Install issues on Oracle EL5 or RHEL5 or SLES10 (VIPCA Failures) Doc ID: Note:414163.1

5. Subject: CRS-0215: Could not start resource 'ora..vip' Doc ID: Note:356535.1

During a VIP status check, your public interfaces gateway is pinged. If you don't have a gateway specified, this check will fail. If that action fails it assumes there is a problem with the Ethernet adapter interface. To resolve this, change the parameter FAIL_WHEN_DEFAULTGW_NOT_FOUND in the $ORA_CRS_HOME/bin/racgvip and set it to 0

clip_image002

This doesn’t mean the VIP will failover, there are some additional checks. Also, the parameter FAIL_WHEN_DEFAULTGW_NOT_FOUND only applies if you don't have a gateway defined in your network setup. If you entered a gateway ip address as per my guide, even tho it may not be pingable, this will have no effect.

6. While troubleshooting VIP failovers I found the following note which details how to increase the timeouts for the VIP service. This didn’t solve any of the issues I encountered but I thought it may be interesting to note:

Subject: ASM Instance Shuts Down Cleanly On Its Own Doc ID: Note:277274.1

7. If you are using vmware on a slow computer you may experience a problem where the VIP’s failover frequently. If that happens you may want to set the following:
Increasing the value of the parameter CHECK_TIMES to 10 may help in this case.
In $ORA_CRS_HOME/bin/racgvip set the following line:

# number of time to check to determine if the interface is down
CHECK_TIMES=2
-- to --

# number of time to check to determine if the interface is down
CHECK_TIMES=10


NOTE: This will only help when the problem is because of slow response from the gateway. Please do NOT use this workaround in other situations. This will have sideaffect of increasing the time to detect a unresponsive public interface.


Subject: VIP Going Offline Intermittantly - Slow Response from Default Gateway Doc ID: Note:399213.1


8. CRS services in an unknown state after reboot. Watching the crs logs I noticed the services weren’t waiting for the appropriate timeout value before erroring. This is a bug with 10.2.0.1 CRS:

Patch 4698419

[10201-050630.0024A_LINUX64]STARTING CRS RESOURCES FAILS WITHOUT WAITING TIMEOUT

Tuesday

Part 2 – Installing OCR, ASM and Database

Pre-Req: Download and obtain 10.2.0.1 clusterware and 10.2.0.1 database from Technet.

  1. Install CVUQDISK package.

    Unzip the clusterware software and cd to ./clusterware/rpm directory. Run the following commands on both nodes:

    [root@raclinux1 ~] export CVUQDISK_GRP=dba
    [root@raclinux1 ~] rpm –iv cvuqdisk-1.0.1-1.rpm
    Preparing packages for installation…
    cvuqdisk-1.0.1-1


  2. Clusterware Install

    Change directory to /clusterware and execute:

    runInstaller -ignoreSysPreReqs

    clip_image002

    Specify the inventory location and group name:

    clip_image004

    Specify the Home details:

    clip_image006

    Ignore warnings on the Prerequisite checks screen below. At the time 10.2.0.1 was released Oracle Enterprise Linux didn’t exist, so the installer doesn’t view it as a supported OS.

    clip_image008

    Cluster Configuration. Click on Add and fill in the information for the second node, raclinux2 as per the screenshot below:

    clip_image010

    Private Interconnect Enforcement… Select eth0, click the Edit button and select public for the interface type since it is the primary network card:

    clip_image012

    Oracle Custer Registry (OCR) location. These have been mounted as /dev/raw/raw3 and /dev/raw/raw4:

    clip_image014

    Voting Disk Locations:
    These have been mounted as /dev/raw/raw1, /dev/raw/raw2 and /dev/raw/raw6:

    clip_image016

    Click Install on the Summary screen:

    clip_image018

    Once the install has completed you will be prompted to execute the following scripts on both nodes

    clip_image020

    The CRS Home root.sh script executes the ocrconfig (Oracle Cluster Registry Configuration Tool) and clscfg (Cluster Configuration tool). These scripts format the voting disks, startup the software and add the daemons to the inittab (OS startup scripts).

    Before executing root.sh, for both nodes, edit the vipca and srvctl files under the CRS bin directory. Search for the string LD_ASSUME_KERNEL and find the line where this variable is set. Unset the variable by placing the following on the next line:

    unset LD_ASSUME_KERNEL

    Set Note: 414163.1 for details.

    Execute root.sh. (Note: don’t return to the runInstaller and click OK signifying the root.sh script has finished until directed to do in a few steps.) Towards the end of the root.sh on raclinux2 output you will see the following error:

    Error 0(Native: listNetInterfaces:[3])
    [Error 0(Native: listNetInterfaces:[3])]

    As per the same note above, on raclinux2 execute the following from the CRS bin directory as root:

    ./oifcfg setif –global eth0/192.168.0.0:public
    ./oifcfg setif –global eth1/10.10.10.0:cluster_interconnect

    clip_image022

    From the same directory launch vipca on raclinux2:

    clip_image024

    On the following screen enter the following information in the screenshot. When you put the IP Alias Name in, the IP Address column will auto populate:

    clip_image026

    A Summary screen is show, on which you click on the Finish button:

    clip_image028

    Once the config finishes you should see configuration results screen:

    clip_image030

    From a command window, as oracle execute crs_stat –t from the Cluster Home bin directory and you should see that all services are online:

    clip_image032

    Now, go back to raclinux1 and click OK that you have finished executing root.sh on both nodes. The following screen will appear and once each of the tools successfully complete click on next:

    clip_image034

    The installation is now complete and you can click on Exit:

    clip_image036

  3. Install ASM.
    Unzip the database 10.2.0 archive and launch:

    runInstaller -ignoreSysPrereqs

    clip_image038

    Select Enterprise Edition and click on next:

    clip_image040

    Change the Oracle Home name and path to reflect this is an ASM install:

    clip_image042

    The runInstaller will detect the cluster, so make sure raclinux2 is checked in the following screen:

    clip_image044

    There will be some warnings in the Prerequisite check screen, these can be ignored for the same reason as the OCR install:

    clip_image046

    Since we are performing an ASM install, select the Configure Automatic Storage Management (ASM) option and enter a password for the sys account:

    clip_image048

    Configure ASM Storage: Since we are using ASMLib you should see the VOL1 you created earlier in the following screen. Select External Redundancy and the ORCL:VOL1 disk:

    clip_image050

    Finally, click the install button:

    clip_image052

    After the install you’ll be prompted to execute the root.sh scripts on both nodes. After which click on the OK button.

    clip_image054

    Installation is now complete and you can click on exit:

    clip_image056

  4. Install Database Software. From the database software staging directory launch:

    runInstaller –ignoreSysPreReqs

    When prompted for Installation Type, select Enterprise edition and click on Next:

    clip_image058

    Verify Home Details
    :

    clip_image060

    Make sure both nodes are selected in the Cluster Installation Screen:

    clip_image062

    Ignore warnings and click on Yes then on the next button:

    clip_image064

    In the Select configuration Option screen select install database Software only:

    clip_image066

    Review the Summary Screen and click on Install:

    clip_image068

    Once the installation is complete you will be shown the following screen, click on Exit:

    clip_image070

  5. Install agent. Note: This assumes you already have grid control or access to a Grid Control installation. If you do not, then you can skip this step and manage the environment using Database Control. Download a copy of Enterprise manager and from raclinux1 launch the runInstaller:

    clip_image072

    If you selected the Mass Agent download from OTN the only option available and preselected is “Additional Management Agent”. Click next and in the following screen modify the Parent Directory to: /home/oracle/product/10.2.0

    clip_image074

    Since this is a clustered environment you will be prompted for a cluster or local install. Select cluster and verify both nodes are selected, and then click next.

    clip_image076

    Select the location of an existing Grid Control Install:

    clip_image078

    Click next and again on the next screen, ignore Oracle Configuration Manager Registration. On the last screen, review the summary and click on Install:

    clip_image080

    Installing:

    clip_image082

    When prompted, execute the root.sh script on each node, and in the correct order:

    clip_image084

    After the installation, click exit:

    clip_image086

  6. Creating the cluster database.

    Change to the $ORACLE_HOME/bin directory and launch dbca. Select the option to create an Oracle Real Application Clusters database:

    clip_image088

    Select Create a Database:

    clip_image090

    Click on the Select All button to make sure both nodes are highlighted:

    clip_image092

    Select the general purpose template:

    clip_image094

    For the global database name and sid, enter RACDB:

    clip_image096

    Select your grid control location in the following window. If you installed the agent earlier it will be automatically selected. If not, Use Database Control will be selected. Click next:

    clip_image098

    Choose a password:

    clip_image100

    Under storage options choose ASM:

    clip_image102

    You’ll be promoted for the ASM sys password:

    clip_image104

    Select the DATA Disk Group:

    clip_image106

    Select Oracle-Managed Files:

    clip_image108

    I didn’t create a second disk group for a flash back recovery area, so just click next on the following screen:

    clip_image110

    Choose the sample schemas so you have some data to play with:

    clip_image112

    You can create services now if you’d like or later via dbca or srvctl:

    clip_image114

    You can customize the initialization parameters to your liking. I choose a custom SGA with 200 for the SGA and 25MB for the PGA. The rest were defaults:

    clip_image116

    In the Database Storage window click on next:

    clip_image118

    Finally, click finish to start the creation process:

    clip_image120

    After you click the Finish button you will be prompted with a summary screen. You should review it to make sure everything looks fine then click on ok:

    clip_image122

    If you selected the Generate Database Creation Script option, they will be generated first. Once it completes a popup will appear letting you know it was successful. After that click OK, you will be returned to the previous screen and click finish again:

    clip_image124

    Once the install completes you will be presented with a screen similar to the one below:

    clip_image126