Sunday

VMWare Tip – Installing an OS from ISO images

I tend to install OS's quite a few times to rebuild environments or try a new version. Previously I would download the ISO's and burn them to cd/dvd but a little while ago a colleague mentioned that Vmware was capable of reading directly from ISO files via the CD-ROM device.


This is pretty simple to do and I wish I had known about it earlier, it would have saved me some hassle. The following is a simple VM which I am going to use for an E-Business Suite R12 environment.


image


Double click on the CD-ROM device and the following window will appear:

image


Select “Use ISO image”, click on the Browse button and select an ISO image. I am installing OEL R5 Update 2, so I browsed to my stage directory and selected the first ISO file:

image


Now the CD-ROM device screen should look like:

image


Note the CD-ROM dvice back in the VM tab:
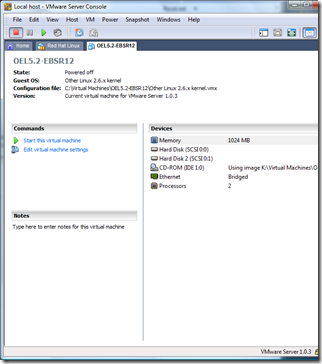
image


Now start the VM and after a few moments you should be brought to the Enteprise Linux boot screen:
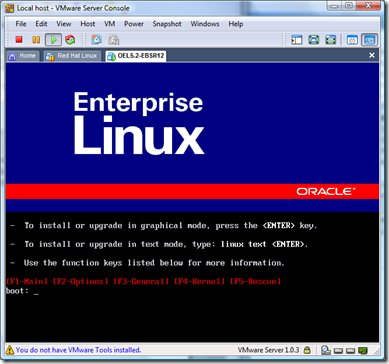
image


If the software you are trying to install has multiple ISO files, at some point during the installation you will be prompted for the next disk. For example, installing OEL5.2:
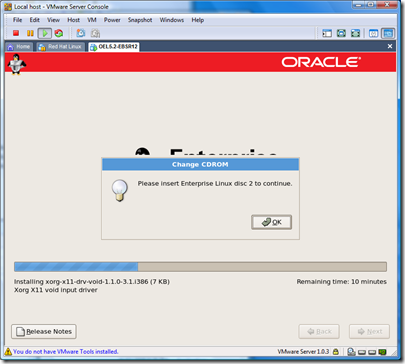
image


All we have to do is point the CD-ROM device to the next ISO image, in this case disc 2. In the toolbar, at the top of the VMware Server Console window, click on VM -> Settings and the following screen will appear:

image


Highlight CD-ROM and on the right hand side click on the Browse button and select the disc2:
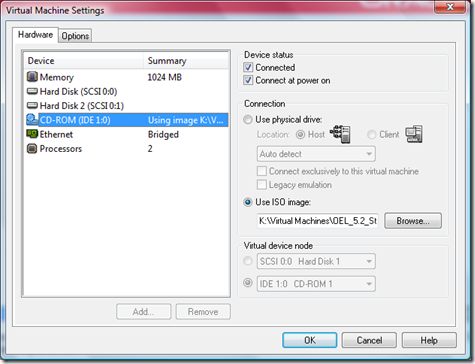
image


After you click on the Open button you will be brought back to the Virtual Machine Settings screen. Click on the OK button. You will now be back in your vmware guest OS which is prompting you for the next CD. For OEL5, click on the OK button and the installation will continue. If there are additional ISO files, then just repeat this process when prompted for the next CD.

Monday

Merging Patches in E-Business Suite

One method to decrease the amount of time it takes to apply a large number of patches is to use AD Merge. AD Merge allows you to combine multiple patches into a single patch. If you have applied multiple patches separately in the past, you've probably noticed that some steps may be repeated for each patch. For example, autoconfig, compiling JSP or database objects, etc may be executed automatically multiple times. You can pass parameters in to adpatch to avoid and perform those tasks manually at the end. As well, even tho its minor, just running through the adpatch prompts for each patch adds up.. (I'll talk about defaultsfile in another post.)

There are some restrictions with AD Merge, it can't be used to merge patches of different releases, platforms or parallel modes.

The first step is to download the patches and uncompress them into a single directory. For the following example I am using the July Security patch release:

oravis@myserver=> ls SRC
6520998 6884665 p6845529_11i_GENERIC.zip
6627387 p6520998_11i_GENERIC.zip p6884665_11i_GENERIC.zip
6845529 p6627387_11i_GENERIC.zip

Execute admrgpch. (I created a directy DEST at the same level as SRC above). The format i'm using below is: -s <source> -d <desintation> -logfile <name> -merge_name <default is merged, so name it appropriately>:

oravis@myserver=> 
admrgpch -s SRC -d DEST -logfile JUL09_merge.log -merge_name jul09cpu_merge


Executing the merge of the patch drivers
-- Processing patch: SRC/6520998
-- Done processing patch: SRC/6520998

-- Processing patch: SRC/6627387
-- Done processing patch: SRC/6627387

-- Processing patch: SRC/6845529
-- Done processing patch: SRC/6845529

-- Processing patch: SRC/6884665
-- Done processing patch: SRC/6884665


Copying files...

100% complete. Copied 9 files of 9...

Character-set converting files...

4 unified drivers merged.

Patch merge completed successfully

Please check the log file at JUL09_merge.log.


oravis@myserver=> ls DEST
6520998_README.html b6520998.ldt fnd
6520998_README.txt b6627387.ldt ibe
6627387_README.html b6845529.ldt j6520998_mwa.zip
6627387_README.txt b6884665.ldt j6627387_ibe.zip
6845529_README.html f6520998.ldt j6884665_frm.zip
6845529_README.txt f6627387.ldt jcopy
6884665_README.html f6845529.ldt u_jul09cpu_merge.drv
6884665_README.txt f6884665.ldt

Finally review the merge log file and verify that there were no errors. I've read that you shouldn't merge AD or FND patches but I can't find anything official on Metalink or in the documentation. AD Merge has only failed on me twice. Once it failed during the merge and another time during the application of the merged patch. When applying the patch with adpatch, change directory into DEST and when prompted use u_jul09cpu_merge.drv for the driver name. Don't forget to perform any post-patch activities that may be required for each patch!

Thats it, merging patches is pretty simple. It has worked great for me in the past and even for small patching efforts like the CPU release above, I use it. Even tho they are pretty quick patches it beats having to apply each one manually.

Thursday

A New Record! Umm.. what comes after Trillion?!

For those that don't know, quadrillion comes after trillion. I had to look it up....

What do you get when you add together:
  • cost of 2,652,527,734,267
  • cpu cost of 729,606,778,262,148,864
  • order by on 200,474,167,178 rows
  • 87 full table scans
  • 5 merge join cartesian
One nasty query!

The following screenshot was taken today and has officially taken first place in my record books!

Wednesday

Cleaning up the FND_NODES Table.

After a clone, you may notice that FND_NODES still contains entries for the source system. You may also see the same thing if you relocate services to a new node. You can query FND_NODES but an easy way to see this is via OAM (Oracle Applications Manager) on the opening overview screen:

(Hostnames blanked for obvious reasons..)


This particular environment has a single application tier and database tier, which means there are 7 extra rows. Note:260887.1 details how to clean up the FND_NODES table (11.5.10-12.0.x) and its very easy to do if your on the latest TXK Autoconfig rollup patch.

Here are the steps:

  • Verify you have at least the TXK AUTOCONFIG ROLLUP PATCH Q (JUL/AUG 2007), patch number 5985992. My environment is a bit out of date so I applied the latest rollup patch S from April/May 2008, patch number 6372396. Personally, if a patch has been replaced I try to go with the latest unless there are too many pre-requisites. In the past i've been bitten by applying the minimum requirement only to have to apply the latest version a little while later. So if its not much more effort, it makes sense to do it.
    • The patch took about 2 hours to apply.
    • NOTE: Make sure you review the README file for this patch. If you have manually added product tops you may need to apply another patch. As well there are a few post-steps but the main one is to refresh the RDBMS AutoConfig files:

      Create the appsutil.zip file by executing:
      $ADPERLPRG $AD_TOP/bin/admkappsutil.pl
      (On Windows: %ADPERLPRG% %AD_TOP%\bin\admkappsutil.pl)
      This will create appsutil.zip in $APPL_TOP/admin/out .

      Copy/ftp the appsutil.zip file to your RDBMS server and:

      cd $ORACLE_HOME
      unzip -o appsutil.zip
      execute AutoConfig:
      $ORACLE_HOME/appsutil/scripts/<context_name>/adautocfg.sh


  • From sqlplus execute the following command:

    SQL> EXEC FND_CONC_CLONE.SETUP_CLEAN;
    COMMIT;

    This deletes data from a few FND tables such as FND_NODES but after AutoConfig has been executed they will contain the correct values.
  • Run AutoConfig ($COMMON_TOP/admin/scripts/<context_name>/adautocfg.sh) on each tier.
  • Startup the environment.


You should now have a nice and clean FND_NODES table:


So why would you want to do this? Personally it just annoyed me seeing incorrect values in OAM. As well, seeing production information in a cloned environment always makes me uneasy. There are other reasons as to why you would want to or may have to do this. If you search Metalink for FND_CONC_CLONE.SETUP_CLEAN you will get a couple of dozen hits. Quite a few notes are related to cloning, clean up or services not starting properly.

There you go, now you have a nice clean FND_NODES table!

Tuesday

Adpatch seems to hang?

While applying a patch to a cloned environment adpatch seemed to hang on the following line:

Attempting to instantiate the current-view snapshot...

If you perform a search of metalink you will get a couple of hits which may solve your problem. One of the problems is that the AD module level is lower than the required version for the patch. The other note mentions that it could be a temp tablespace issue. In my case, both of those checked out ok.

Before I continue, what is a snapshot?

There are two types of snapshosts, APPL_TOP and global. APPL_TOP snapshots contain version of files and patches applied within that APPL_TOP. A global snapshot contains the same information but for the entire environment, ie. all APPL_TOPS.

The global view snapshot is used when you use Patch Wizard to determine whether or not a patch has been applied. APPL_TOP snapshots are using by autopatch (adpatch) to determine if all prerequisite patches have been applied. Each time you apply a patch AutoPatch updates the current view snapshot. I believe it may even create a new current view snapshot and just replace the existing one.

Additionally there are two types of snapshots, current view and named. A named snapshot is just a copy of the current view snapshot at a given point in time. Patch wizard and AutoPatch use current view snapshots.

To access snapshot information launch adadmin, select option 2 - Maintain Applications Files menu, select 5 - Maintain snapshot information and you will see the menu below:


Maintain Snapshot Information
-------------------------------------------

1. List snapshots

2. Update current view snapshot

3. Create named snapshot

4. Export snapshot to file

5. Import snapshot from file

6. Delete named snapshot(s)

7. Return to Maintain Applications Files menu


Back to the problem of adpatch seeming to hang while instantiating a current-view snapshot. Since this is a cloned environment, a snapshot doesn't exist yet for the APPL_TOP. So before AutoPatch can check if prerequistite patches have been applied, it must create a snapshot. This process can take 1-2 hours depending on how fast your servers are. You can avoid this by running "Update current view snapshot" via adadmin after you clone.

I should add, that in my experience I've only encountered this problem a few times. Most of the patches I apply to a cloned environment are quick one-offs with no pre-reqs. Large patching efforts such as family packs or patches with pre-reqs may experience this problem. I haven't tried, but if your crunched for time you may be able to bypass adpatch updating the current view snapshot by specifying "adpatch options=noprereq" to skip the prerequisite check.

Sunday

Monitoring Forms sessions in OAM

One of the monitoring features of OAM, Oracle Applications Manager is the ability to view forms sessions and details about them. Login to OAM and proceeed to the Applications Dashboard -> Performance (tab). You will see a summary of activity similiar to the following:


Note: If you see a 0 next to "Forms Sessions" your environment may not be setup correctly. Skip down to the bottom of this post. As well, I've blanked out alot of information that may be sensitive. I'm in the process of setting up an R12 demo environment and once that is done take screenshots from there so I don't have to worry about making the company I work for mad.

From there you can click on the link to the right of "Forms Sessions" and you will be brought to a page similar to the following:


On this page you will see a list of the forms sessions, the usernames of those who launched the form, responsibility used. As well as an indication of how much resources the form is consuming such as memory, cpu, and IO. From here you can drill down into each forms session by clicking on a link in the AUDSID column or by selecting the row and click on the "Session Details" button. That will bring you to a screen similar to the following:


This page will provide you with more session information (sid, serial#, etc) and session wait statistics. If you'd like to collect more information about this session you can also enable tracing and view the output.

Very useful.

Forms Sessions showing a 0?


Check the profile option "Sign-on: Audit level" and make sure it is set to "Form". This is required in order to monitor forms sessions.

In case your curious, there are 4 valid values for this profile option: None, User, Reponsibility and Form. As you progress from None to Form additional information is collected and stored.

  • None - Obvious, nothing is audited.
  • User - FND_LOGINS table gets updated with one record per user session.
  • Reponsibility - Same as User, as well, FND_LOGIN_RESPONSIBILITIES will be updated with 1 record for each responsibility used during the session.
  • Form - Same as user and responsibility, plus FND_LOGIN_RESP_FORMS will be updated with one record for each form selected during the session.
As with any audting, you should determine how long you require the data and purge/archive it. In order to purge data in the above tables you need to schedule the concurrent program, "Purge Signon Audit Data". This program requires one parameter, Audit Date. All data older than this date will be deleted. Note: this program deletes data in the above tables as well as FND_UNSUCCESSFUL_LOGINS.

Beware: Enabling auditing does have a slight impact on performance.

Note: Purge Signon Audit Data executes $FND_TOP/sql/FNDSCPRG.sql