A couple of people are going through the steps now... I'll update this page to reflect any issues they have encountered or items that may require further clarification. I'll admit up front that the steps could be more efficient. So feel free to post or email comments, errors, etc...
The reason I am posting this is because I couldn't find a complete guide online that worked for me. So hopefully it will be of use to someone else.... Part 2, Installing OCR, ASM and the database software and Part 3, issues and solutions will follow shortly.
- Download VMware Server and Oracle Enterprise Linux version 5. For this install I burnt OEL 5 to CD.
- Install VMware
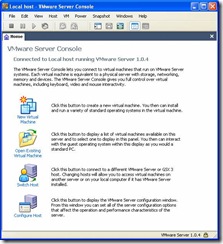
- Launch VMware Server Console and select New Virtual Machine:
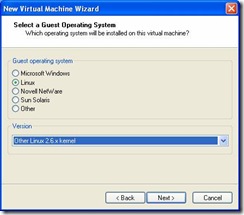
- Choose a Custom install and Select Guest Operating System
- Select a Virtual Machine name and Location. Enter: raclinux1.

- Select Virtual Memory. For this install I choose 720MB which I believe is the same as the demo environments Oracle shipped. Keep in mind that the guides recommend a minimum of 1GB.

- Network Type. Select Use Bridged Networking:

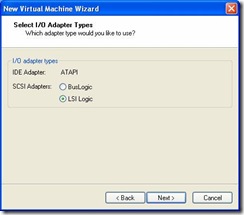
- I/O Adapter type. Select LSI Logic:
- Create a virtual disk to house the Linux install and Oracle Software. You will need around 4GB for the Oracle software and 3GB for the Linux install options that I will choose later on.

On the next screen choose SCSI. - Specify the size of your virtual disk. Unless you plan on selecting Allocate all disk space now, then it doesn’t really matter what size you select for the disk. VMware will grow the disk as needed and the value specified will be a hard limit. Note: Performance is better if you allocate all disk now.

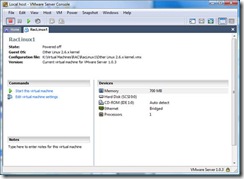
On the following screen choose a file name for your image. Enter raclinux.vmx - Make sure you have the Enterprise Linux cdrom loaded and start your virtual machine:
- You should now see the following screen:
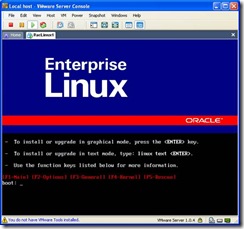
Hit> to start the install. - The following doesn’t show detailed screenshots of how Linux was installed. It will briefly list some of key options/configs that were choosen.
Here is the partition information. By default your swap partition may be larger, I resized mine. If this was a real server the partitioning would be drastically different but for a vmware RAC playground this is fine.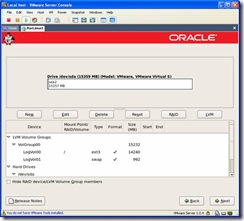
- When you arrive at the Network Devices screen, enter raclinux1 for the hostname and 192.168.0.1 for the gateway.
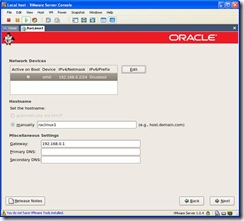
Click on edit and you will see the following screen. Make sure DHCP is deselected and enter an IP address. For this install private IP Address space is being used so enter 192.168.0.2.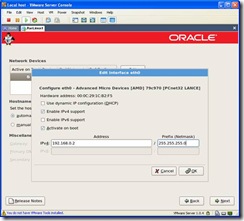
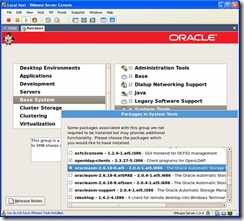
- At this point you’ll be installing the software. I choose the customize option and selected a number of options including, X Window System, Server Configuration Tools, FTP Server, Development tools, Administration Tools and System tools. Regardless of which way you choose to install linux, verify the following packages are selected. In Legacy Network Server, verify rsh-server and telnet-server are selected. In System Tools, verify oracleasm and oracleasm-support are selected. Development Tools, specifically gcc will be needed for the vmware tools install below in step 31.
Once the software has finished installing, click on reboot and verify the OS boots up properly and complete the post-install tasks.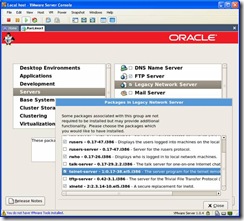
Once the install is complete there is a reboot. - After the reboot there are post-install configuration tasks where you’ll be asked the current time, firewall settings etc. Disable the firewall and SELinux. Since this is only a sandbox security isn’t a concern and leaving the firewall enabled will cause some issues later.

Choosing this option will require another reboot in which the filesystem will be relabeled. - When prompted to create a user, use the name oracle. We’ll fix it up with the correct groups, etc, later.
Once the post-install is complete there will be another reboot. Once the environment has restarted, shutdown the VM. The next phase is to add the shared storage configuration. - Shared Disk Setup. Next we have to create the shared storage. For this configuration we’ll be creating 3 voting disks, 2 disk for OCR (Oracle Clusterware) files and 1 disk for ASM (which will house the database files). So you will need to complete the following steps 5 times. Reference the following chart for data you will have to enter:
- Add Ethernet Adapter. By default a VM comes with an Ethernet adapter created. We need to add another one for the private interconnect. So under the Virtual Machine Settings, which is the same place you were to add additional hard drives, click on Add -> Ethernet Adapter -> Next -> Select Host-only network connection -> Finish.
- Shared Disk Config. In order to enable disk sharing for the disks we just created, we need to modify the virtual machine configuration file. From the VMware Server Console you can find the location of your configuration file in the top left hand corner.
Before the line:
scsi1.present = "TRUE"
Add:
disk.locking = "FALSE"
diskLib.dataCacheMaxSize = "0"
scsi1.sharedBus = "virtual”
After each line similar to:
scsi1:0.mode = "independent-persistent"
Add:
scsi1:0.deviceType = "disk”
Note the bold 0, make sure that for each device you put in the correct number. For the first device its 0, followed by 1, etc. ie. A small snip of my config file. - Login as root and go to Network Configuration:

On the following screen select eth0 and click on edit. (If you configured Eth0 above when you installed linux, you can skip down to Eth1.)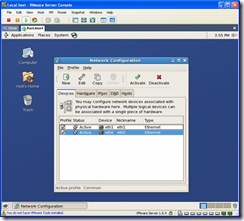
Select Statically set IP addresses. Change the IP Address to 192.168.0.2, Subnet mask to 255.255.255.0 and Gateway to 192.168.0.1.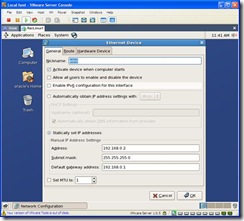
Click on OK. Now select Eth1 (this is the Private Interconnect) and click on edit. Select Statically set IP addresses. Change the IP Address to 10.10.10.102 and Subnet mask to 255.255.255.0.
To enable the changes go back to the Network Configuration screen, highlight an Ethernet adapter, click on deactivate. Once the status changes to Inactive click on Activate. Or you can simply reboot.
Once the reboot has completed or network services restarted we can proceed with setting up the OS. - Verify Kernel Parameters.
- Verify Package requirements. Using rpm –qa verify the following packages are installed. If they are not, they can be found on the following disks:
Disk 2
libXp-1.0.0-8.i386
Disk3
compat-db-4.2.52-5.1.i386.rpm
openmotif-2.3.0-0.3.el5.i386.rpm If you need to install these packages, place the insert the correct CD and wait for Linux to mount it. Once its mounted a cd icon will appear on your desktop. Open it and traverse to the Server directory. Double click on the file to install it. You will be prompted for the root password if your not logged in as root.
 - Enable Hangcheck-timer. This is a kernel module which monitors the OS for hangs and if one occurs, reboots the server. This should already be installed but not enabled. To enable add the following entry to /etc/modprobe.conf
options hangcheck-timer hangcheck_tick=30 hangcheck_margin=180
Without rebooting you can load this kernel module by executing the command:
/sbin/modprobe –v hangcheck-timer
To verify its running:
[root@raclinux1]# /sbin/lsmod | grep –i hang
hangcheck_timer 8025 0
Hangcheck_tick is the interval in which the module checks for hangs. Hangcheck_margin is how long the module waits for a response. If the system doesn’t respond within the sum of these two parameters, the system is rebooted. So in this case, if there is no response in 210 seconds, the server reboots. - Modify /etc/hosts so it looks like the following:
127.0.0.1 localhost
192.168.0.2 raclinux1
192.168.0.102 raclinux1-vip
10.10.10.102 raclinux1-priv
192.168.0.3 raclinux2
192.168.0.103 raclinux2-vip
10.10.10.103 raclinux2-priv - User shell limits
Add the following to /etc/security/limits.conf:* soft nproc 2047
* hard nproc 16384
* soft nofile 1024
* hard nofile 65536
Add the following line to /etc/pam.d/login
session required /lib/security/pam_limits.so - Groups and User. Next we need to create an oracle unix account and two groups, oinstall and dba
/usr/sbin/groupadd -g 500 oinstall
/usr/sbin/groupadd -g 501 dba
If you didn’t create an oracle account when you performed the Linux install:/usr/sbin/useradd –u 500 –d /home/oracle –g “oinstall” –G “dba” –m –s /bin/bash oracle
If you did create the oracle account in the steps above then you need to modify the account and add it to the oinstall and dba groups.

Double click on the oracle user, click on the groups tab and select the groups dba and oinstall. Select oinstall as the primary group:
- Download and install ASMLib
Goto http://www.oracle.com/technology/software/tech/linux/asmlib/rhel5.html and download asmlib for your architecture.
For the OEL 5 version I have installed the correct file is: http://otn.oracle.com/software/tech/linux/asmlib/files/RPMS/rhel5/x86/2.0.3/oracleasmlib-2.0.3-1.el5.i386.rpm

- Partition the raw volumes for the Voting, OCR and ASM disks. For each device (/dev/sdb, /dev/sdc, /dev/sdd, /dev/sde, /dev/sdf, /dev/sdg) perform the following (responses are in bold):
# fdisk /dev/sdb
Command (m for help): n
Command action
e extended
p primary partition (1-4)
p
Partition number (1-4): 1
First cylinder (1-512, default 1):<enter>
Using default value 1
Last cylinder or +size or +sizeM or +sizeK (1-512, default 512):>
Using default value 512
Command (m for help): w
The partition table has been altered!
Calling ioctl() to re-read partition table.
Syncing disks. - Bind the above partitions to raw devices. Edit /etc/udev/rules.d/60-raw.rules and add:
ACTION=="add", KERNEL=="sdb1", RUN+="/bin/raw /dev/raw/raw1 %N"
ACTION=="add", KERNEL=="sdc1", RUN+="/bin/raw /dev/raw/raw2 %N"
ACTION=="add", KERNEL=="sdd1", RUN+="/bin/raw /dev/raw/raw3 %N"
ACTION=="add", KERNEL=="sde1", RUN+="/bin/raw /dev/raw/raw4 %N"
ACTION=="add", KERNEL=="sdg1", RUN+="/bin/raw /dev/raw/raw6 %N"
Create a file, /etc/udev/rules.d/99-raw.rules and add:
KERNEL=="raw[3-4]", OWNER="root", GROUP="dba", MODE="640"
KERNEL=="raw[1-2]", OWNER="oracle", GROUP="oinstall", MODE="660"
KERNEL=="raw[5-6]", OWNER="oracle", GROUP="oinstall", MODE="660"
This will not come into effect until you reboot. - Install VMware tools. On the VMware Server Console, click on the menu item VM -> Install VMware Tools.

Click on the VMwareTools*.rpm file, when prompted for the root password enter it. When the Installing Packages window appears click on apply. You may get a window saying the rpm can’t be verified, click Install anyway.
As root launch vmware-config-tools.pl from the command line. When prompted to build the vmhgfs module say no unless you have the kernel source installed. Whem prompted for others say yes. At the end you will be prompted for a screen resolution size, pick the value you’d like.
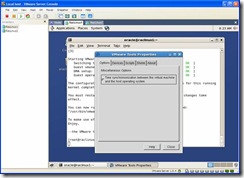
Note: If this isn't working for you, login as Oracle and try again. - As root run vmware-toolbox. Select the “Time synchrononization between the virtual machine and the host operating system” option.
Again, as root, edit the /boot/grub/grub.conf file and enter “clock=pit nosmp noapic nolapic” to the kernel line. I would suggest that you create a new kernel config in case you make a typo: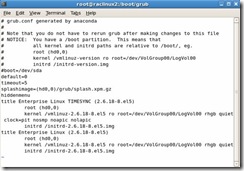
- Shutdown linux and prepare to copy the vmware image to create another server.
/sbin/shutdown –h now - Once the vmware instance has been shutdown copy your RacLinux1 folder to RacLinux2. In my case I have it installed under c:\Oracle\Virtual Machines\RacLinux1. Two methods to do this:
· Start up Windows Explorer, navigate to the directory above, right click on RacLinux1 and select copy. Right click in the folder and select paste. Then rename the “Copy of RacLinux1” to Raclinux2.
· From a command prompt type:
cd c:\
cd Oracle\Virtual Machines
cp RacLinux1 RacLinux2 - Back in your VMware Server Console, select File -> Open -> Browse, navigate to the Raclinux2 virtual machine location, c:\Oracle\Virtual Machines\Raclinux2, select the .vmx file and click on open.

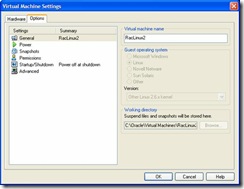
- RacLinux2 will now show up in your inventory. Right click on RacLinux2 and select Settings. When the settings window opens click on the options table and change the Virtual Machine name to RacLinux2:
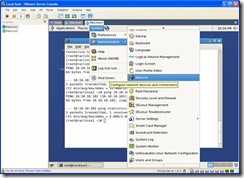
- Leaving the RacLinux1 VM down, startup RacLinux2. We now need to change its network properties. Once the vm has started, login as root. Click on the menu item, System -> Administration -> Network:
- User Equivalence - In order to RAC to install properly user equivalence must be setup. This allows the oracle user to remotely login to the other node without supplying a password to be able to copy the software during the install.
· On each node, as oracle, execute:
/usr/bin/ssh-keygen -t rsa
/usr/bin/ssh-keygen -t dsa
· Concatenate id_dsa.pub from both nodes into the authorized keys file on the first node:[oracle@raclinux1 ~]$ cat ~/.ssh/id_rsa.pub >> ~/.ssh/authorized_keys
[oracle@raclinux1 ~]$ cat ~/.ssh/id_dsa.pub >> ~/.ssh/authorized_keys
[oracle@raclinux1 ~]$ ssh raclinux2 “cat ~/.ssh/id_rsa.pub” >> ~/.ssh/authorized_keys
[oracle@raclinux1 ~]$ ssh raclinux2 “cat ~/.ssh/id_dsa.pub” >> ~/.ssh/authorized_keys
· Copy the authorized_keys file on raclinux1 to raclinux2:
[oracle@raclinux1 ~]$ scp ~/.ssh/authorized_keys raclinux2:/home/oracle/.ssh/
· Test the connection. On raclinux1 type:
ssh raclinux2 date
You should do this for every combination of server and hostname. ie. From raclinux2, type ssh raclinux1 date. As well as ssh raclinux2-priv, ssh raclinux1-priv from each host.
Example output:
RacLinux1: [After the below on raclinux2 has been completed]
 RacLinux2:
- On each node, as root, configure ASMLib:


| Type | Disk Size | Filename | Virtual Device Node |
| Voting Disk 1 | 0.5GB | Votingdisk1.vmdk | SCSI 1:0 |
| Voting Disk 2 | 0.5GB | Votingdisk2.vmdk | SCSI 1:1 |
| OCR Disk 1 | 0.5GB | OCRdisk1.vmdk | SCSI 1:2 |
| OCR Disk 2 | 0.5GB | OCRdisk2.vmdk | SCSI 1:3 |
| ASM Disk | 5GB | ASMdisk1.vmdk | SCSI 1:4 |
| Voting Disk 3 | 0.5GB | Votingdisk3.vmdk | SCSI 1:5 |
· In the VMware Server Console, click “Edit virtual machine settings”, click on the add button, select Hard Disk under Hardware types and click on next:
· Select “Create a New Virtual Disk” -> Next (button) -> type SCSI -> Next ->;enter the Disk size (as above) -> Next -> Filename (as above). Since these are shared disks you should save them in a different folder than your vmware image. Ie, if in step 5 you selected the location c:\Virtual Machines\Raclinux1 then you may want to select c:\Virtual Machines\RacSharedStorage for the shared disks.
· Click on the Advanced Tab, change Virtual Device Node as per chart above and Independent:Persistent for Mode:


You should now have something similar to the screenshot below:

disk.locking = "FALSE"
diskLib.dataCacheMaxSize = "0"
scsi1.sharedBus = "virtual"

scsi1.present = "TRUE"
scsi1:0.present = "TRUE"
scsi1:0.fileName = "c:\Virtual Machines\sharedstorage\OCRDisk1.vmdk"
scsi1:0.mode = "independent-persistent"
scsi1:0.deviceType = "disk"
scsi1:1.present = "TRUE"
scsi1:1.fileName = "c:\Virtual Machines\sharedstorage\OCRDisk2.vmdk"
scsi1:1.mode = "independent-persistent"
scsi1:1.deviceType = "disk"
Save the file and start up the VM.


To verify parameters, you can use the sysctl command. However, since this is a fresh install there are the entries I had to make to the /etc/sysctl.conf file:
Kernel.sem = 250 32000 100 128
Kernel.shmni = 4096
Fs.file-max=65536
Rmem_max=262144
Rmem_default=262144
Wmem_default=262144
Wmem_max=262144
Net.ipv4.ip_local_port_range = 1024 65000
A default Enterprise Linux install already has shmmax and shmall set higher than the pre-reqs.


or click the Stop button on the toolbar of the VMware Server Console.


· If you have devices eth0.bak and eth1.bak, uncheck each one under the profile option followed by clicking on the delete button.
· For eth0 and eth1 change the IP Address to 192.168.0.3 and 10.10.10.103 respectively.
· Click on the DNS tab and change your hostname to raclinux2
· For each eth0 and eth1, click on the deactivate button, followed by the activate button. When prompted to save changes click yes.
Now you can start the RacLinux1 VM. Once both are up and running, verify that you can ping the other from each node.


- On each node, under the Oracle user add the following to the $HOME/.bashrc file:
export ORACLE_SID=RACDB1 (Note: RACDB2 for node raclinux2)
export ORACLE_BASE=/home/oracle/product/10.2.0
export ORACLE_HOME=$ORACLE_BASE/db_1
export ORA_CRS_HOME=$ORACLE_BASE/crs
export LD_LIBRARY_PATH=$ORACLE_HOME/lib
export PATH=$ORACLE_HOME/bin:$ORA_CRS_HOME/bin:/bin:/usr/bin:/usr/sbin:/usr/local/bin:/usr/X11R6/bin
umask 022
Create ASM disks. On either node, as root execute:
/etc/init.d/oracleasm createdisk VOL1 /dev/sdf1
1 comment:
Hi ,
Can you send update the part 2 and Part 3
anuj
Post a Comment