While installing VM Manager 2.1.5 today an error occurred during the install. I’m using an existing database instead of Oracle XE and its version 11.2.0.1.
Deploying Oracle VM Manager application to OC4J container.
Creating connection pool … Failed
Please see /var/log/ovm-manager/oc4j.log for more information.
From the oc4j.log:
2011-03-30 15:01:36.381 WARNING J2EE DS-00001 Exception occurred testing connection. Exception: java.sql.SQLException: ORA-01017: invalid username/password; logon denied
Nothing turned up on Metalink. It didn’t make much sense to me until I remember that passwords by default in 11g are case sensitive. I disabled the feature by issuing:
SQL> alter system set SEC_CASE_SENSITIVE_LOGON=false scope=spfile;
and restarted the database. When I tried to install VM Manager again it was successful. I plan to upgrade it to the latest version, 2.2.1 and will check to see if that version supports case insensitivity.

Tuesday
Weblogic–Patching with the Smart Update utility
We currently use Grid Control 10g to monitor some of our environments. Its running on a server that needs to be decommissioned so I decided to go ahead and install 11g and migrate the setup.
Grid Control 11g requires Weblogic, which I have installed many times and while going through the install guide for Grid Control 11g I noticed that you need to apply patch ID WDJ7.
I’ve never patched a weblogic environment before (although its on my list to do since I need to apply security patches to some other environments). My initial thought was “Oh great”, expecting it not to be a simple straightforward process or to encounter issues during the install. My background is as an e-Business Suite DBA. The EBS dba’s out there can certainly understand where I’m coming from. (Although I have to say, even EBS has improved over the years.)
Anyways, long story short, I expected patching Weblogic to be complicated but I was pleasantly surprised to find that its very simple. My environment is 64bit linux. The first step is to launch the Smart Update utility by executing $BEA_HOME/utils/bsu/bsu.sh.
Note: This is an X based application, so you’ll need to make sure your DISPLAY environment variable is set appropriately. After you login with your Metalink account information, the first screen you’ll see is:

Click on the Get Patches tab:

As you can see above I selected the patch required WDJ7 as well as the latest CPU Advisory. Once you click on the Download Selected button you’ll be presented with a few screens before the download actually happens.
Once the download has finished you’ll be brought back to the Smart Update utilities main screen.

Notice that even tho only two updates were selected to be downloaded, there are quite a few listed. Click on the Manage Patches tab:
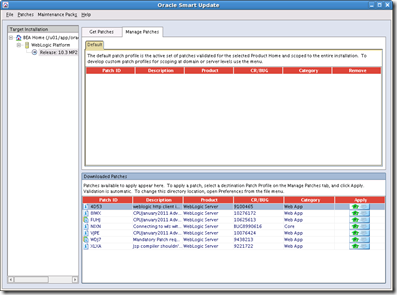
Click on the Apply button to the right of the patch you’d like to install. Before you do that notice the icons next to the Patch ID and Description columns. The Smart Update utility seems to break apart the patches to show the individual bugs addressed. If you click on the apply button next to 4D53 for example, you’ll be prompted with:

So 4D53 is part of WDJ7 and could be applied separately if you wanted to. Notice that the icon to the left of WDJ7 is layered which means it’s a patch set. If you click on the apply button next to WDJ7, all the patches included in the patch set will be applied at the same time. In the case of WDJ7 that includes 4D53, NIXN and XLXA.
I’ve tried removing just a single patch included with WDJ7 and reapplying it with no issues. That’s pretty cool. Potentially if you hit an issue with a particular patch breaking something you can easily remove it.
Once all the patches are applied:
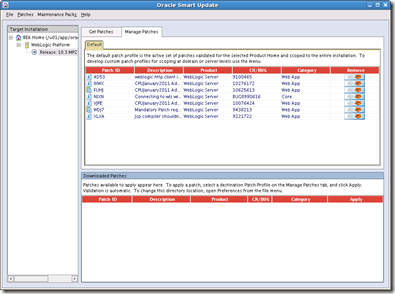
That’s it.
Grid Control 11g requires Weblogic, which I have installed many times and while going through the install guide for Grid Control 11g I noticed that you need to apply patch ID WDJ7.
I’ve never patched a weblogic environment before (although its on my list to do since I need to apply security patches to some other environments). My initial thought was “Oh great”, expecting it not to be a simple straightforward process or to encounter issues during the install. My background is as an e-Business Suite DBA. The EBS dba’s out there can certainly understand where I’m coming from. (Although I have to say, even EBS has improved over the years.)
Anyways, long story short, I expected patching Weblogic to be complicated but I was pleasantly surprised to find that its very simple. My environment is 64bit linux. The first step is to launch the Smart Update utility by executing $BEA_HOME/utils/bsu/bsu.sh.
Note: This is an X based application, so you’ll need to make sure your DISPLAY environment variable is set appropriately. After you login with your Metalink account information, the first screen you’ll see is:

Click on the Get Patches tab:

As you can see above I selected the patch required WDJ7 as well as the latest CPU Advisory. Once you click on the Download Selected button you’ll be presented with a few screens before the download actually happens.
Once the download has finished you’ll be brought back to the Smart Update utilities main screen.

Notice that even tho only two updates were selected to be downloaded, there are quite a few listed. Click on the Manage Patches tab:

Click on the Apply button to the right of the patch you’d like to install. Before you do that notice the icons next to the Patch ID and Description columns. The Smart Update utility seems to break apart the patches to show the individual bugs addressed. If you click on the apply button next to 4D53 for example, you’ll be prompted with:

So 4D53 is part of WDJ7 and could be applied separately if you wanted to. Notice that the icon to the left of WDJ7 is layered which means it’s a patch set. If you click on the apply button next to WDJ7, all the patches included in the patch set will be applied at the same time. In the case of WDJ7 that includes 4D53, NIXN and XLXA.
I’ve tried removing just a single patch included with WDJ7 and reapplying it with no issues. That’s pretty cool. Potentially if you hit an issue with a particular patch breaking something you can easily remove it.
Once all the patches are applied:

That’s it.
Friday
How to deregister the appsTier or dbTier.
During my upgrade from 32bit to 64bit, as described in my last post, I hit an unexpected issue. After migrating, the environment wouldn’t start up successfully. By successfully, I mean all services being available.
As part of my upgrade to 32bit I migrated the application to new servers, thus new server names, etc. I quickly noticed in FND_NODES, FND_DATABASES, tnsnames files, etc that there were still references to the old servers as well as the new. Since I already migrated the database I couldn’t use the standard way to deregister a tier.
Example, to deregister an application tier it is:
perl $AD_TOP/bin/adgentns.pl appspass=<APPSpwd> \
contextfile=<CONTEXT> –removeserver
So the question is, how do I deregister a tier if I’ve already moved it? Manually using the FND_NET_SERVICES package.
First execute the following query:
select NAME, SERVER_TYPE from FND_APP_SERVERS, FND_NODES
where FND_APP_SERVERS.NODE_ID = FND_NODES.NODE_ID and
SERVER_TYPE in ('DB',’APPS"’)
 and FND_NODES.NODE_NAME=upper('hostname');
Substitute hostname with the name of your old servers. Sample output:
NAME SERVER_TYPE
---------------------- ------------------------------
myserver_VIS_APPS APPS
myserver_VIS_DB DB
The next step is to call FND_NET_SERVICES.remove_server(SYSTEM_NAME, SERVER_NAME); to remove them. Example:
begin
FND_NET_SERVICES.remove_server( 'VIS', 'myserver_VIS_DB');
end;
begin
FND_NET_SERVICES.remove_server('VIS', ‘myserver_VIS_APPS');
end;
The last step is to run autoconfig on both the dbTier and appsTier.
Once I hit that issue, in my first development pass, I could have modified my steps to deregister the tiers. However, I didn’t want to modify the original environment in any way. Worst case scenario, if some issues were encountered during the migration or testing phase, I could rollback to the original environment.
R12 Migration: 32bit–> 64bit Overview
I’ve had a few enquiries as to the steps I used to migrate our R12 environment from 32bit to 64bit. Fortunately we were moving to new hardware at the same time, which made the process easier. Instead of having to backup the server, wipe it and install 64bit Linux, I could just migrate the data.
As for step 19, it’s a bit detailed, so I will post details in a follow up shortly.
- We use Red Hat Linux, so the first step was to install the 64bit version on the new server and make sure all the setup steps were performed.
Oracle E-Business Suite Installation and Upgrade Notes Release 12 (12.1.1) for Linux x86-64 [ID 761566.1]
The above note details all of the operating system requirements and is very easy to follow.
- Shutdown the application tier.
- Export OLAP Analytic Workspaces.
OLAP, as far as I know, is only used for the EPB (Enterprise, Planning & Budgeting) and ODP (Oracle Demand Planning) modules. I asked Oracle Support if I needed to migrate OLAP if we aren’t or didn’t plan on using these modules. They stated no, so I didn’t export them. If you are using OLAP be aware of this note:
EPB AW's Cannot Be Attached Or Do Not Exist [ID 795247.1]
- Execute preclone on the appsTier. ($ADMIN_SCRIPTS_HOME/adpreclone.pl appsTier)
- Backup the controlfile to trace.
alter database backup control file to trace; - Move necessary files to the new servers:
* Application software.
* Database datafiles
* Files under $ORACLE_HOME/dbs such as the password file, parameter file, etc.
* Control File trace. - Install the 11.2.0 64bit software on the new server, including the examples CD.
- Create the 9inls directory:
perl $ORACLE_HOME/nls/data/old/cr9idata.pl - Apply the necessary database patches:
8328200,8993052,9081430,9218789,9318214,9500046,9535951,
9644960,9657344,9719541,9756939
NOTE: For Patch 9218789: opatch napply -skip_subset -skip_duplicate
You may have to set the following environment variable:
export OPATCH_PLATFORM_ID=226
Failed To Apply Patch Opatch Detects Platform 46 While Patch Is For 226 [ID 337812.1] - On the new server create the control files using the backup you created in step 5.
- Start the database in UPGRADE mode:
STARTUP UPGRADE; - Invalidate and recompile database objects:
?/rdbms/admin/utlirp
?/rdbms/admin/utlrp
Note: If you didn’t export and drop the OLAP schema then you may hit error:
ORA-03113 And ORA-03114 While Running Utlrp.sql [ID 578940.1]
The solution is to run the following and re-run utlrp.sql:
@?/olap/admin/olap.sql SYSAUX TEMP;
I didn’t drop OLAP as per the instructions since I was migrating the database to a new server and the rollback plan in the event of a problem was simply to use the old servers. - Import OLAP analytical workspaces
If you need to migrate OLAP then this is where you would want to import them. - On the appsTier set the following environment variable:
LDEMULATION to elf_i386 - Update CTXORIG.xml
This file can be found under <COMMON_TOP>/clone/context/apps
Modify the following line:
<platform oa_var="s_platform" osd="LINUX_X86-64">LINUX_X86-64</platform>
- Use Netca to create a new Listener. Otherwise you’ll hit issues while trying to implement autoconfig. Create it with the same name and port as the source environment. Add an entry for the SID to the listener.ora. Restart the listener.
- Implement Autconfig on DB Tier.
This step struck me as weird because we haven’t built the appsTier yet. So I basically just copied the old appsutil.zip from $INST_TOP on the source server.
Unzip -o appsutil.zip in the DB Oracle Home
Set TNS_ADMIN=$ORACLE_HOME/network/admin
Create Context File
perl adbldxml.pl
Run autoconfig
adconfig.sh contextfile=/u01/VIS/db/tech_st/11.2.0/appsutil/VIS_myserver.xml - Execute Post Clone on the Apps Tier
$COMMON_TOP/clone/bin
perl adcfgclone.pl appsTier - Deregister the old Application and Database servers.
- Modify $AD_TOP/bin/adrelinknew.sh
CPP_LDFLAGS=' -L$(ORACLE_HOME)/lib -L$(ORACLE_HOME)/lib/stubs -lclntsh -Wl,--noinhibit-exec' - Relink AD executables (Use AD Relink for this step)
Relink Applications programs
Generate message files
Generate form files
Generate report files
Generate product JAR files
As for step 19, it’s a bit detailed, so I will post details in a follow up shortly.
Monday
R12.1.2 Cloning Issues
I have encountered two issues with cloning after our upgrade to R12.1.2.
The first:
[AutoConfig Error Report]
The following report lists errors AutoConfig encountered during each
phase of its execution. Errors are grouped by directory and phase.
The report format is:
<filename> <phase> <return code where appropriate>
[APPLY PHASE]
AutoConfig could not successfully execute the following scripts:
Directory: /u01/VIS/db/tech_st/11.2.0/perl/bin/perl -I /u01/VIS/db/tech_st/11.2.0/perl/lib/5.8.3 -I /u01/VIS/db/tech_st/11.2.0/perl/lib/site_perl/5.8.3 -I /u01/VIS/db/tech_st/11.2.0/appsutil/perl /u01/VIS/db/tech_st/11.2.0/appsutil/clone
ouicli.pl INSTE8_APPLY 255
AutoConfig is exiting with status 1
RC-50013: Fatal: Instantiate driver did not complete successfully.
/u01/VIS/db/tech_st/11.2.0/appsutil/driver/regclone.drv
This error was caused by Rapid Clone using an incorrect version of perl. By default my system has v5.8.8 installed in /usr/bin. The solution was to update my PATH variable to point to $ORACLE_HOME/perl/bin, which is v5.10.0.
The second issue I encountered while building a new environment. I normally bring over the database home directory and reconfigure it for the new environment with adcfgclone.pl dbTechStack, then I use RMAN to duplicate the database. However, then I tried to startup the database in nomount mode I received an ORA-1031.
I traced the problem using the following Metalink Notes:
Checklist for Resolving CONNECT AS SYSDBA (INTERNAL) Issues [ID 233223.1]
UNIX: Checklist for Resolving Connect AS SYSDBA Issues [ID 69642.1]
Which brought me to note:
SYSDBA and SYSOPER Privileges in Oracle [ID 50507.1]
It appears that my config.o file was corrupted. You can fix it by relinking:
I say that my config.o was corrupted because config.c looks ok and I didn’t make any changes to it. For a detailed description about config.o take a look at 50507.1.
I encountered this back in Dec and noticed the other day that Oracle has come out with a patch:
Error: ORA-01031: insufficient privileges : SQLPLUS Fails After Rapid Clone adcfgclone.pl dbTier/dbTechStack With 11gR2 Database [ID 1276420.1]
I’m not sure if its my problem since they mention it occurs with dbTechStack and I don’t recall encountering it there. But if you are cloning an environment and don't have time to test this patch, try reconfiguring your database Oracle Home with dbTechStack, rebuild config.o then run adcfgclone with the database parameter. (Remember dbTier = database + dbTechStack.)
The first:
[AutoConfig Error Report]
The following report lists errors AutoConfig encountered during each
phase of its execution. Errors are grouped by directory and phase.
The report format is:
<filename> <phase> <return code where appropriate>
[APPLY PHASE]
AutoConfig could not successfully execute the following scripts:
Directory: /u01/VIS/db/tech_st/11.2.0/perl/bin/perl -I /u01/VIS/db/tech_st/11.2.0/perl/lib/5.8.3 -I /u01/VIS/db/tech_st/11.2.0/perl/lib/site_perl/5.8.3 -I /u01/VIS/db/tech_st/11.2.0/appsutil/perl /u01/VIS/db/tech_st/11.2.0/appsutil/clone
ouicli.pl INSTE8_APPLY 255
AutoConfig is exiting with status 1
RC-50013: Fatal: Instantiate driver did not complete successfully.
/u01/VIS/db/tech_st/11.2.0/appsutil/driver/regclone.drv
This error was caused by Rapid Clone using an incorrect version of perl. By default my system has v5.8.8 installed in /usr/bin. The solution was to update my PATH variable to point to $ORACLE_HOME/perl/bin, which is v5.10.0.
The second issue I encountered while building a new environment. I normally bring over the database home directory and reconfigure it for the new environment with adcfgclone.pl dbTechStack, then I use RMAN to duplicate the database. However, then I tried to startup the database in nomount mode I received an ORA-1031.
I traced the problem using the following Metalink Notes:
Checklist for Resolving CONNECT AS SYSDBA (INTERNAL) Issues [ID 233223.1]
UNIX: Checklist for Resolving Connect AS SYSDBA Issues [ID 69642.1]
Which brought me to note:
SYSDBA and SYSOPER Privileges in Oracle [ID 50507.1]
It appears that my config.o file was corrupted. You can fix it by relinking:
mv config.o config.o.orig
make -f ins_rdbms.mk ioracle
I say that my config.o was corrupted because config.c looks ok and I didn’t make any changes to it. For a detailed description about config.o take a look at 50507.1.
I encountered this back in Dec and noticed the other day that Oracle has come out with a patch:
Error: ORA-01031: insufficient privileges : SQLPLUS Fails After Rapid Clone adcfgclone.pl dbTier/dbTechStack With 11gR2 Database [ID 1276420.1]
I’m not sure if its my problem since they mention it occurs with dbTechStack and I don’t recall encountering it there. But if you are cloning an environment and don't have time to test this patch, try reconfiguring your database Oracle Home with dbTechStack, rebuild config.o then run adcfgclone with the database parameter. (Remember dbTier = database + dbTechStack.)
Subscribe to:
Posts (Atom)